Insurance App Design: Best Practices and Tips
- Updated on 9 Jan 2024
- 8 min

Polina Hrudieva
UX/UI expert
Designing an insurance app comes with its own set of challenges and considerations.
In this guide, we’ll walk through the key steps, costs, and best practices for creating a successful insurance app. Whether you’re a startup founder, entrepreneur, or product manager, this article has insights you can apply.
Here’s what we’ll cover:
- What makes insurance app design unique and tricky to get right
- The main roadblocks teams run into and how to avoid them
- A step-by-step breakdown of the design process
- Factors that influence cost and timelines
- Helpful tips and advice from expert designers
If you prefer visuals, feel free to jump ahead to the infographic.
What Makes Insurance App Design Unique?
Insurance applications deal with sensitive data of all kinds. Therefore, app design must ensure that functions that use these types of data, including personal and financial, are simple, straightforward, and secure to work with.
Both User Experience design and User Interface design should address potential usage issues before they arise. In addition, they must be engaging enough to make the product viral and appealing to new users.
In this sense, the design of InsurTech products is similar to healthcare and FinTech app design.
Let’s take a look at a few challenges so that we know exactly what we’re talking about.
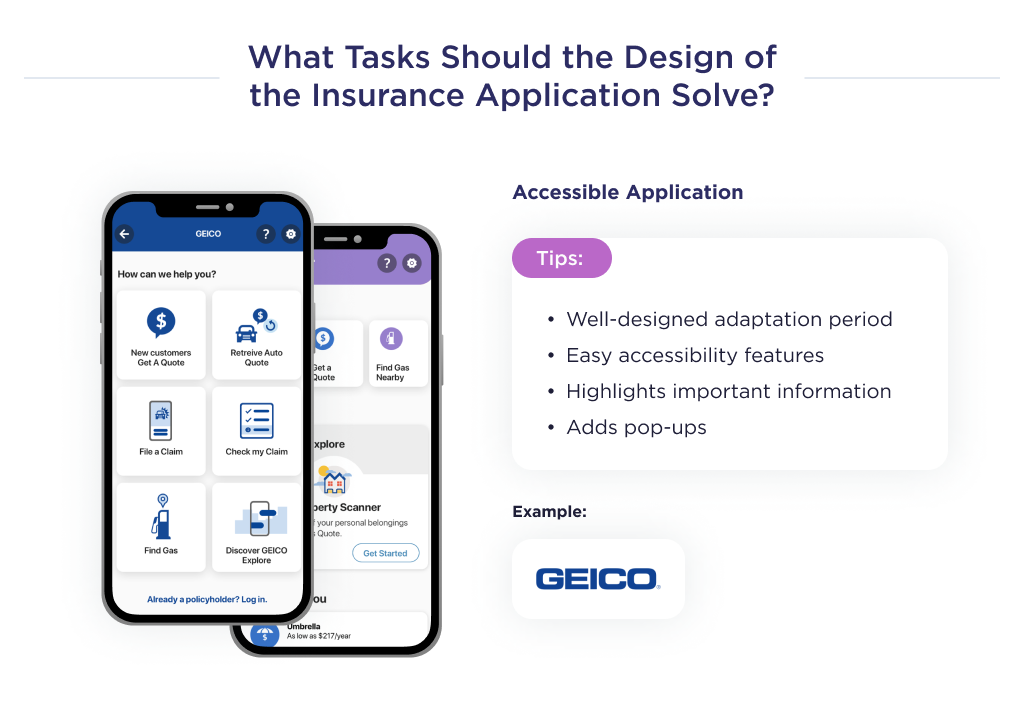
Challenge 1. Make the App Accessible to All
Overall, the accessible design is based on the principles we discussed above: simple and straightforward interactions that lead to predictable application feedback.
In the case of insurance app design, we need to make sure that accessibility is a leading design factor in general and in particular.
And the particular case is about designing disability-friendly features that provide easy access to the app’s functions.
An example of an insurance application with impressive accessible features is Geico Mobile.
Here’s a checklist of tips to improve accessibility on an insurance mobile application:
- Have a well-laid-out onboarding process,
- Highlight using bold fonts, pop-ups, or notifications for important instructions,
- Add information pop-ups,
- Implement a text-to-audio feature, and so on.
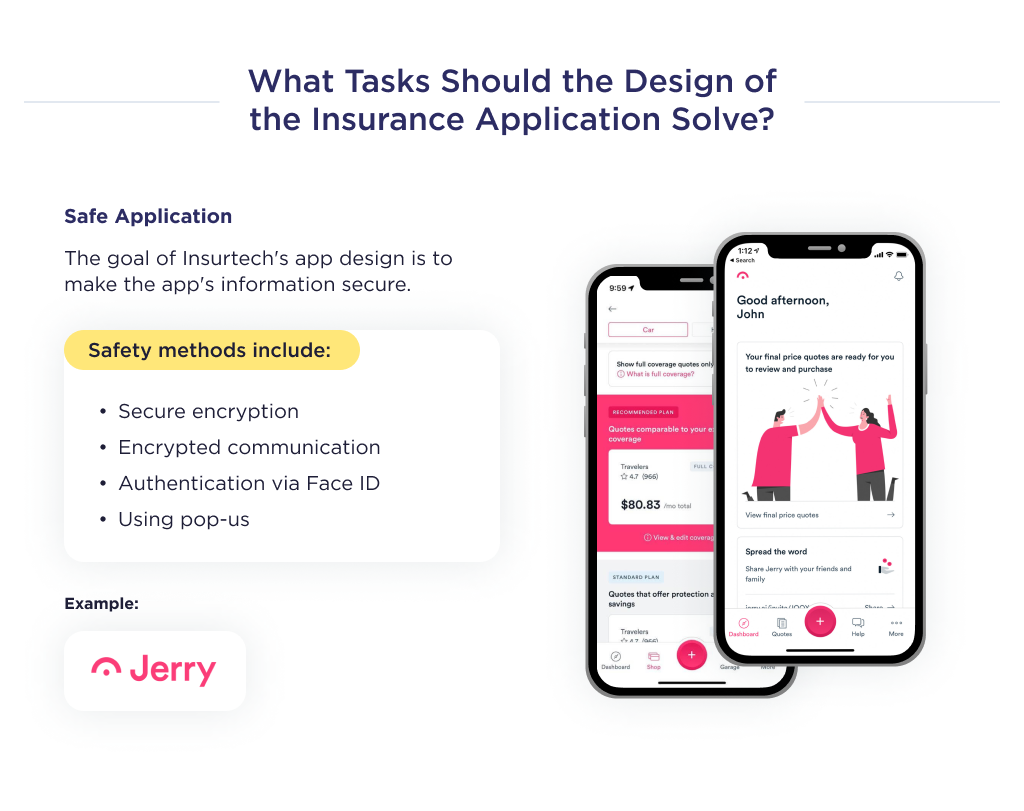
Another challenge to surmount is making the application safe for users and insurance agents.
Let’s discuss this.
Challenge 2. Prioritize Security and Safety
An insurance app development process should involve the creation of numerous security-enhancing features for both agents and consumers.
Security practices to safeguard insurance apps include:
- Secure coding,
- Encrypted communication between the app and the server,
- Inclusion of frontier security features. E.g, iPhone fingerprint authorization,
- And so on.
The aim of Insurtech application design should be to show users that sensitive information uploaded on the app is safe.
A great way to ensure this is via information pop-ups detailing how information is gathered and used. A page may also be dedicated to this.
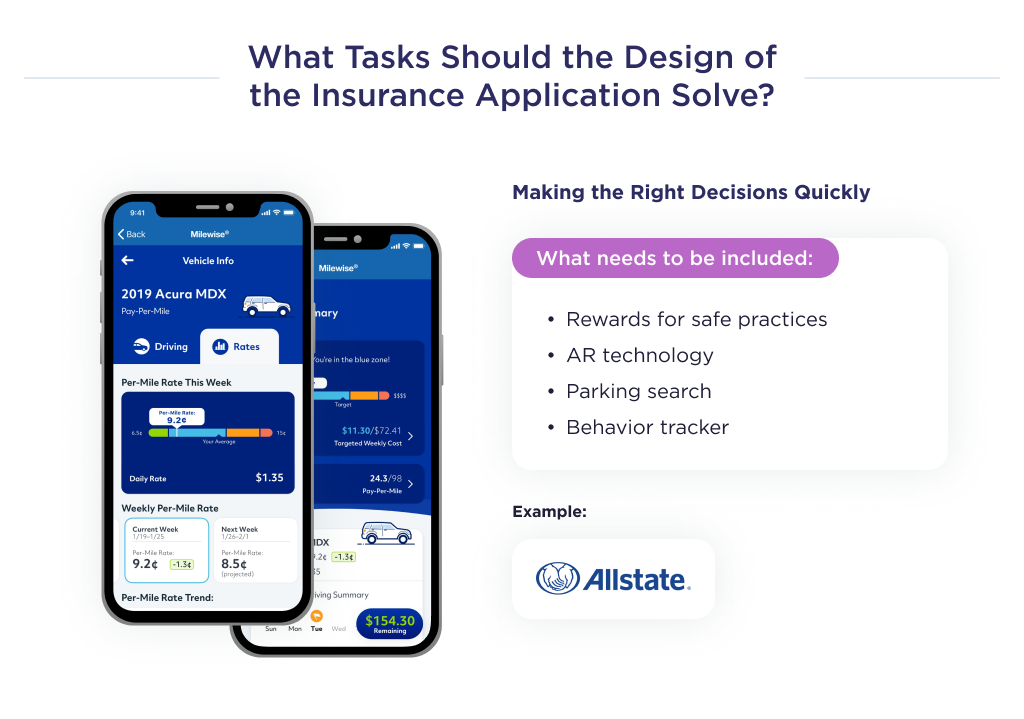
Another challenge to surmount is designing the UX in a way that ensures users make sound decisions fast.
Let’s delve right into that.
Challenge 3. Guide Users to Smart Decisions
Your insurance app’s interface should include features to help users make decisions that can provide an optimum experience. Here’s what we mean.
Assuming you own a goods-in-transit insurance app for eCommerce startups, you could add a feature that educates users with tips for transporting perishable items.
A perfect case study for this is Allstate Mobile. It’s an insurance application that provides driving tips, and also rewards users with up to a 25% refund for safe behavior.
An example of a platform with multiple tips to help users is Esurance Mobile.
Things to include in your insurance app to help the insured make great decisions are:
- Rewards for safe practices,
- AR to show escape routes in the advent of a disaster,
- In-app parking locator,
- Social media behavioral tracker, and so on.
Now that you know the core challenges for insurance app design to surmount, let’s discuss the design process of insurance mobile apps.
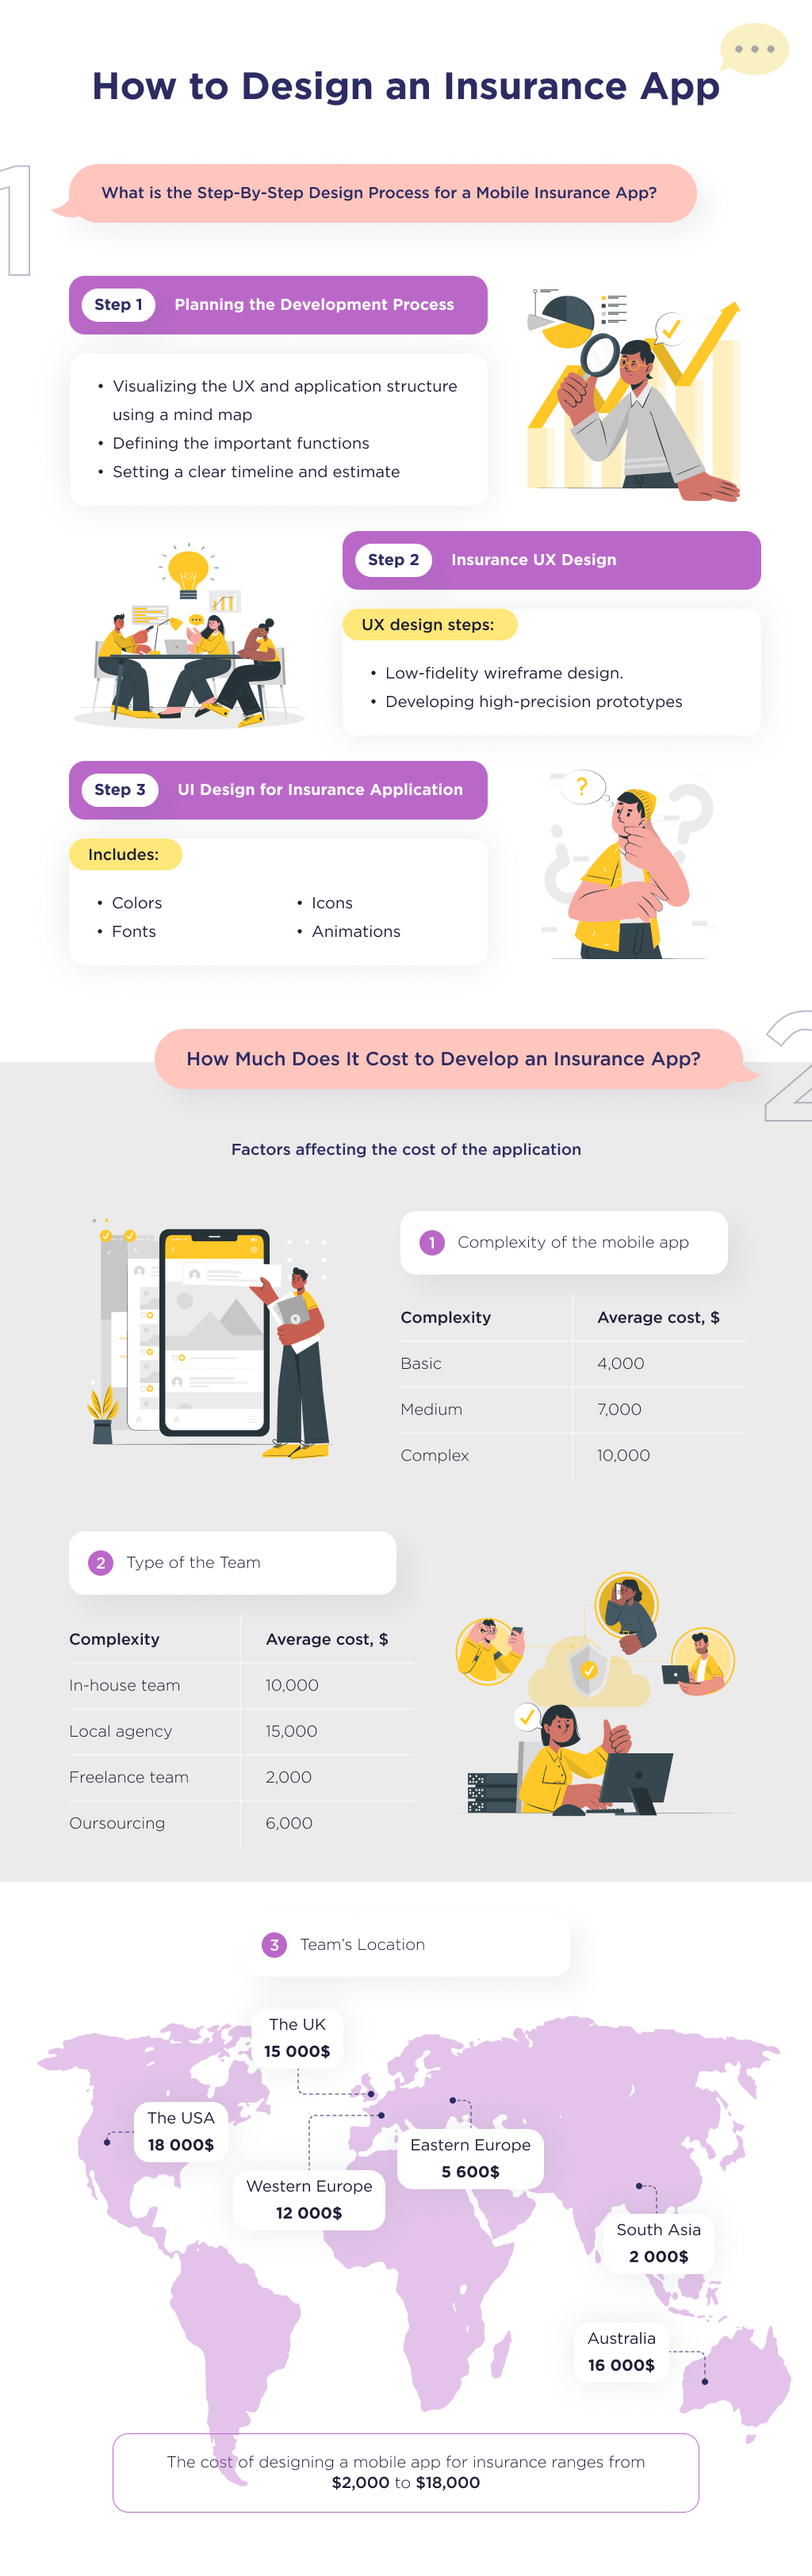
How to Design an Insurance App
Regardless of the type of insurance application, target market, or audience, the app design process should include the following steps:
- Design mapping
- User experience or UX design
- User interface or UI design
Let’s take a look at the details of each step.
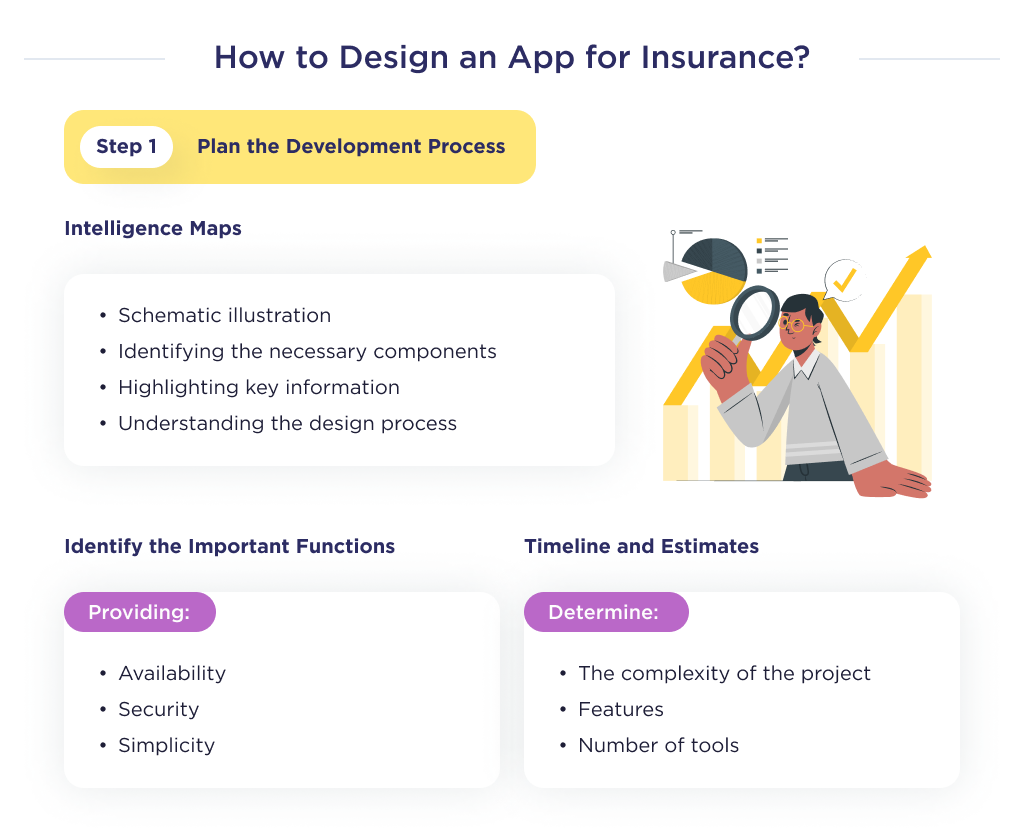
Step 1. Map Out the Design Process
The team must have a good overview of the mobile app development process before you begin.
As such the mobile app UI/UX designer should create a mind map for the solution, outline prospective features, and estimate the timeframe for project completion.
Here’s a checklist of tasks involved in this phase:
- Mindmap
- Feature outline
- Timeframe and cost-estimate
Let’s help you understand each point in detail.
1. Mind Mapping
Here, the UI/UX designer creates a diagrammatic representation of the app’s user experience and structure.
This process helps to break down the founder’s idea and identify the most ideal components to include on specific pages within the app.
Doing this helps the designer to understand the idea better and how best to produce the design.
2. Identify Relevant Features
Once the designer has a good overview of the idea, he or she in conjunction with the project manager begins to identify relevant features expected by the founder, and the ones essential to ensure the process functions optimally.
The features added in the design must ensure the app is accessible, guarantee security, and guides them to make optimum decisions.
3. Timeframe and cost estimate
The time frame for the project is primarily influenced by the complexity, features, number of pages and the tools employed in the product design process.
This in turn determines the cost of design, as the price is directly proportional to the time expended on the project.
Once the design process is planned, the User Experience design begins.
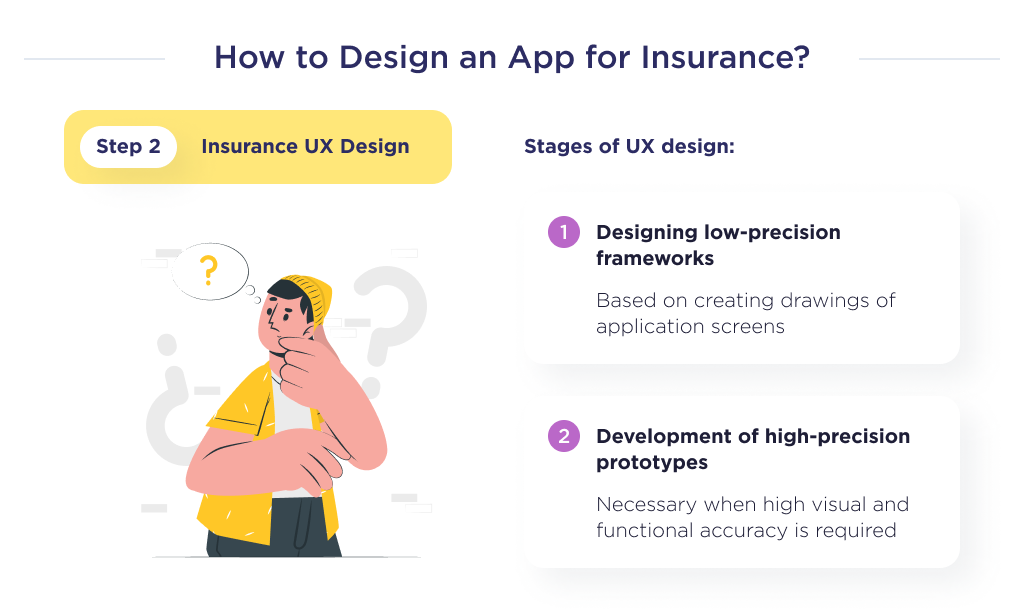
Step 2. Craft the User Experience
The user experience design is in charge of how the app will work. In other words, what experience will the user receive using an insurance app?
In this step, the team visualizes the founder’s ideas about how the app should work and the value it should provide to customers.
The UX design stage takes up 70% of the UI/UX process, thus, designers spend the greatest amount of time here. Steps in UX design:
- Designing low-fidelity wireframes
- Designing high-fidelity prototypes
Let’s give a succinct explanation of the steps involved here.
Although mind mapping is a foundational step here, since it has been executed in the planning stage to have a better overview of the process, we’ll jump to other steps.
1. Create Low-fidelity Wireframes
Often to design a low-fidelity wireframe, teams use paper.
A paper-based wireframe is a technique that’s centered around creating hand drawings of different app screens to represent the product’s interfaces.
It’s advisable to start here as it’s easy to refine the design and make adjustments made by other team members.
But it’s also fine if the team will use tools like Balsamiq. Once this step is done, let’s move to make prototypes of the insurance app more detailed.
2. Create High-fidelity Prototypes
Here, mockups made in low-fidelity prototypes are redrawn using design tools like Figma or Adobe XD to ensure they appear and function similarly to the expected delivery.
High-fidelity prototypes are interactive designs that allow founders to have a first-hand feel of the features in the design.
It gives the founder a close resemblance of what to expect in the overall deliverable.
Once the UX designs are created, the next step is developing a design for the interface. Let’s also discuss.
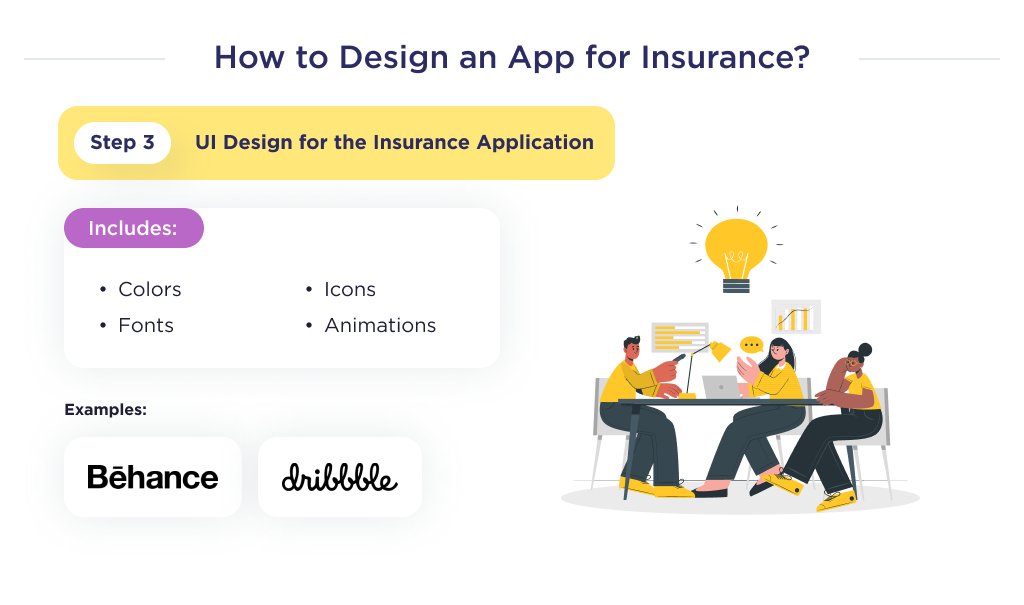
Step 3. Build an Intuitive Interface
The user interface design is the rendering of your UX prototypes into the final look of the application.
The insurance app’s UI stands for colors, fonts, icons, animations, and everything else of the visual component of the design.
Sometimes you may hear the opinion that UI is less important than UX. However, UI is about engaging users and forming emotional connections between the user and the product.
Thus, a well-done UI is directly related to achieving the insurance app’s business goals.
Let’s talk about the colors of the app, for example. The right use of color palettes in UI kits compliments user experience efforts by giving hints on features.
Cold colors like green, violet, indigo, and blue are associated with trust and confidence. Also, green is mostly associated with nature and healthcare so it might be a great UI color for a health insurance app.
The lack of suggestive colors in your design may leave end-users confused, and find your insurance product undesirable.
Bright colors in interfaces can enhance user experience, which can make boring Insurtech niches like life insurance more appealing. There are tons of references and ideas for Insurtech UI styles on Behance and Dribbble.
Now that you’re more knowledgeable on the steps to create an Insurtech UI/UX design that stands out, let’s discuss its cost implications.
Factors Impacting Insurance App Design Costs
Insurance application design cost ranges from $4,000 to $8,000.
However, for an exact estimate of the cost of designing an application in the insurance field, then you’ll have to consider several factors.
These include the complexity of the app, the type of team, and the location of the team. Let’s discuss each of these points.
The App’s Complexity
The complexity of the insurance mobile applications refers to the set of functions, entities, and user roles inherent in the app.
Increasing UX/UI design coverage leads to increased complexity.
And since very complex designs will logically require more time to develop, they cost more than basic designs.
For example, design for a car insurance application with AR, voice-to-text, and other high-end features will cost more than the same application with fewer features.
Below is a spreadsheet showing cost based on complexity.
| Complexity Level | Average cost, $ |
| Basic | 4,000 |
| Average | 7,000 |
| Complex | 10,000 |
The team type is another cost-influencing factor to consider. Let’s dig into that.
The Team’s Structure
Let’s see how much it takes to create the UI/UX design for an insurance app using different teams.
| Type | Average cost, $ |
| In-house, US | 10,000 |
| Local Development Company, US | 15,000 |
| Freelance | 2,000 |
| Outsource, Ukraine | 6,000 |
Beyond team type, another factor to consider is location. Let’s discuss this in detail.
The Team’s Location
Below are some top destinations for outsourcing UI/UX designers.
The cost estimate in the spreadsheet below is for a full-month, 160 hours design project.
| Type | Average cost, $ |
| Australia | 16,000 |
| The USA | 18,000 |
| The UK | 15,000 |
| Western Europe | 12,000 |
| Eastern Europe | 5,600 |
| South Asia | 2,000 |
Outsourcing from each of those countries has its pros and cons.
As seen in the spreadsheet above, hiring a team of designers domiciled in the US would require an exorbitant amount. The same goes for UI/UX designers in Australia, The UK, and Western Europe.
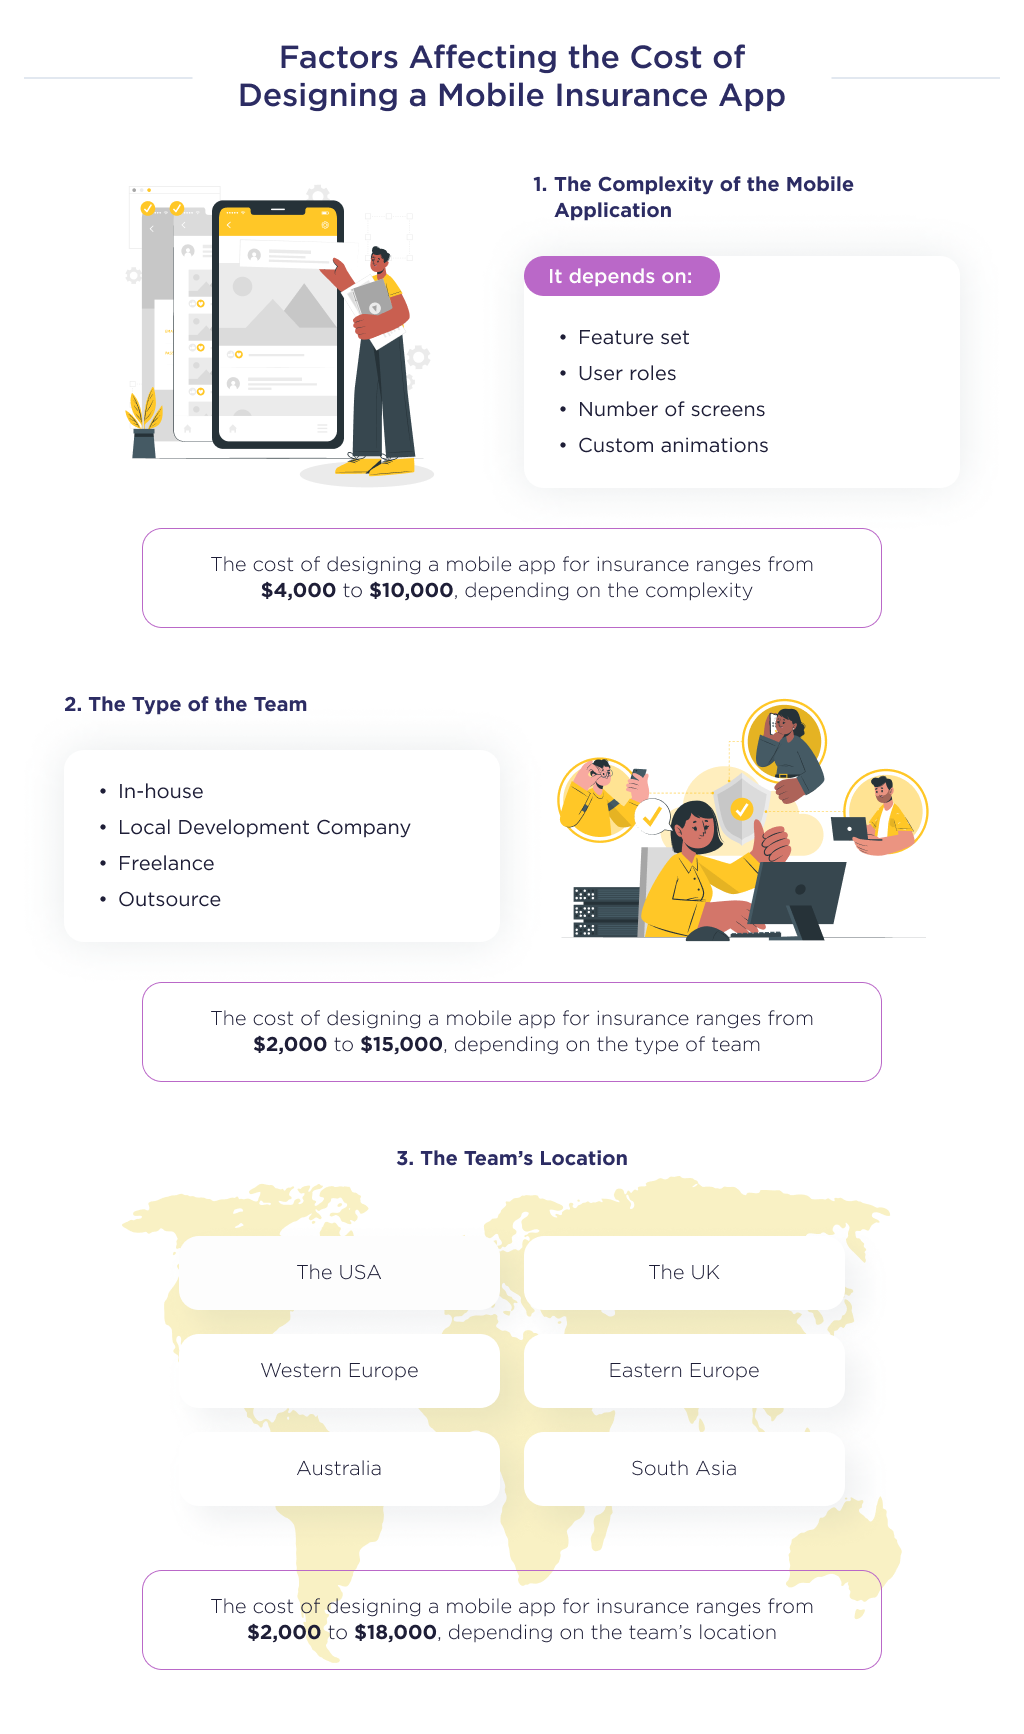
However, South Asia, albeit the cheapest on the list, is known for poor quality. For the best designs at cost-efficient prices, it’s advisable to outsource from Eastern Europe.
Looking for an InsurTech App Designer?
Designing a user-friendly, intuitive insurance app takes careful planning, strategizing, and execution. By following the best practices outlined here, you’ll be well on your way to creating an insurance app people love to use.
If you need an experienced partner to handle the end-to-end UI/UX design for your insurance mobile app (whether iOS, Android, or cross-platform), our team can help.
Explore our portfolio, and let’s discuss your insurance app objectives and how we can bring your vision to life through thoughtful UX and appealing visual design.
Bonus Infographic
Here is a summary of our detailed guide. Learn about the basics of insurance app design and what factors affect the cost of insurance mobile app design.