
Workato Introduction
Workato is a low-code/no-code, cloud-based iPaaS Solution that is hosted on public cloud infrastructure from Google Cloud Platform and Amazon Web Services (AWS). It means everything you create here is a drag-and-drop application component that resides on cloud.
Workato Connector
To achieve any automation in the Workato tool, we create a recipe. The recipe contains a set of actions to perform any business automation. To define actions in the recipes, we use connectors. Hence, Workato connectors are the building blocks of recipes. Connectors in the Workato can be readily available in the Workato marketplace. We just need to drag in the recipe flow to use its capability, which we called it as pre-build connectors, or we can create our own connectors as per our requirement, which we called it as custom connectors. A connector allows Workato to interact with a single application through a series of triggers and actions.
There are 2 ways to build an SDK Connector
- Cloud SDK Console
- To know more about Cloud SDK Console, follow this link. Using the Workato Connector SDK | Workato Docs
- SDK Gem
- This is a local development method. Where we can build our own connectors locally and which can be deployed to the cloud upon connector functioning as expected. Following is detailed information on local custom connector development.
Local connector involved a series of steps which are given below:
1. Ruby Installation Process
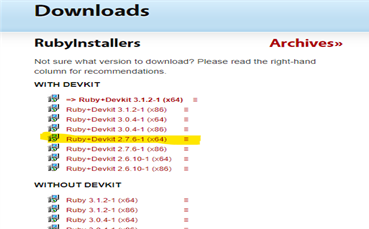
- Download the Ruby installer from RubyInstaller for Windows prefer the 2.7.X version.
- Complete the installation process following the instructions that appear on the installation wizard.
- Installing MYSYS2 Components:
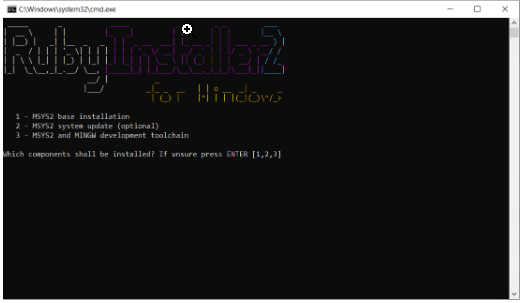
[Note: Simply press enter to download the required package for Workato-connector-sdk ]
- You can verify your Ruby version by running the ruby -v command
2. Workato Installation Process
- To install charlock_holmes use ridk exec pacman -S mingw-w64-x86_64-icu icu-devel icu command
- Run gem install charlock_holmes — –with-icui18nlib=icuin –with- icudatalib=icudt command
- Windows users need to install the tzinfo-data gem by running gem install tzinfo-data command
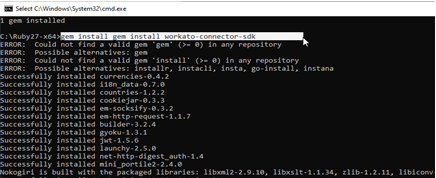
- To install the Workato-Connector-sdk, by using the gem install workato-connector-sdk command
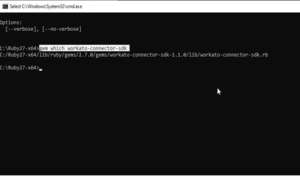
- Verify that your gem is correctly installed by workato command and to check the exact location of the gem, use gem which workato-connector-sdk command
 [Note: Now you are all set up with the environment, which is required to develop a custom connector on your local machine]
3. Creating Custom Connector
- To create a new connector project, use workato new<PATH> command
- In PATH, provide the local path of the system where you want to install the required file to create the connector. You may be prompted about HTTP mocking behavior.
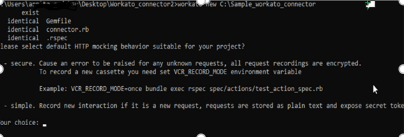
- Enter your choice using 1 or 2
- Can see some files are installed in your provided path, right click on connector, choose the edit with notepad++ option

- Write your custom connector source code there; once done with the code save it and exit
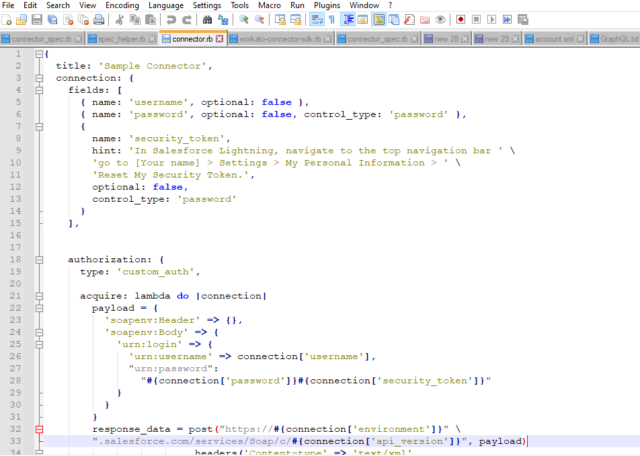
Sample source code, this connector doesn’t need any credentials for connection

- If your connector needs connection credentials, use the below commands
set EDITOR=notepad
workato edit settings.yaml ——- this is for a simple one
set EDITOR=notepad
workato edit settings.yaml.enc ———–This is for a secure one
- To test your connector, use workato exce test command

- Test your connector’s triggers or actions with the below command
workato exec actions.<action>.execute

workato exec triggers.<Triggers>.poll
4. Deploying Custom Connector to Cloud
- Push to your Workato workspace
- workato push –api- email=’WORKATO_EMAIL_ADDRESS’ –api-token=’WORKATO API TOKEN’-n=’Initial version’ –environment=’https://app.workato.com
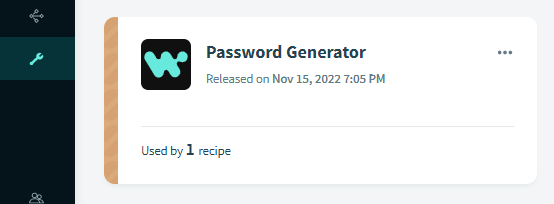
Password Generator Custom Connector:
This connector is created as part of POC. This connector will help to generate and assign the password when the user signs up for the first time.
- You can see your connector in Workato workspace connector SDK. You can also customize the logo of the connector.
- Recipe using a custom connector
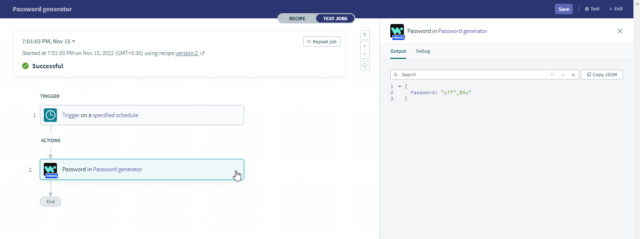
You can use a connector in recipes according to your need.
In this way, we can create a custom connector locally, deploy it to the Workato workspace, and use it according to the recipes’ requirements.
Perficient + Workato
At Perficient, we excel in tactical Workato implementations by helping you address the full spectrum of challenges with lasting solutions rather than relying on band-aid fixes. The end result is intelligent, multifunctional assets that reduce costs over time and equip your organization to proactively prepare for future integration demands.
Contact us today to learn how we can help you to implement integration solutions with Workato.
Very Informative and really helpful , well done Arpita !!
Informative read !
Informative read !
Very Helpful!!!!