
Okta is a secure, user-friendly, customizable solution for allowing authenticated access to your applications. By choosing Okta, one of the world’s largest authentication services, developers can significantly reduce the overhead involved with application security risks, maintenance, and building a scalable solution from scratch. Choosing Okta as an authenticated platform simply allows users to log in with a username/password or with social accounts, such as Google or LinkedIn.
To show you how it works, let’s get started by configuring Okta to work with Amazon Connect.
Amazon Connect / Okta Configuration
We must first create an Amazon Connect instance to be used by the Okta platform.
- After this is complete, login to your Okta Administrator account.
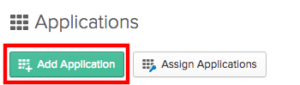
- Choose Applications.
- Select Add Application.
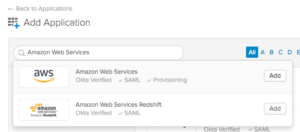
We then search for Amazon Connect Web Services in the Search Bar provided and select Add next to the application.
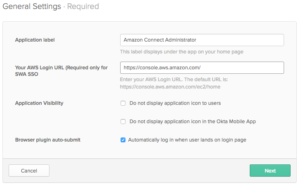
We update the general settings with an Application Label, Login URL, and then continue with the remaining defaults selected.
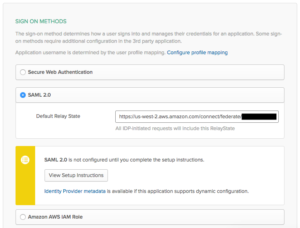
In the Sign On Methods section,
- Choose SAML 2.0 and enter the Amazon Connect instance id as a prefix to the Default Relay State. For more information regarding how to find the Connect instance id, refer to Find your Amazon Connect instance ID/ARN – Amazon Connect.
- Right-clickIdentity Provider metadata and save the target file to your computer to be used later.
Open a new tab:
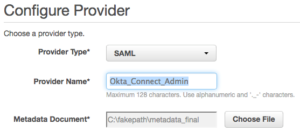
- Go to the IAM Console.
- Select Identity Providers within the Navigation Pane.
- Choose SAML as a Provider Type.
- Add Okta_Connect_Admin as a Provider Name.
- Upload the metadata document we saved recently.
- Select Next and Create.
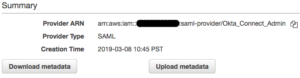
- Upon completion, select Okta to view details and copy the Provider ARN and paste it into a document to be used later.
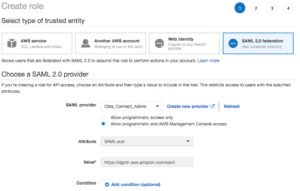
Choose Roles from the Navigation pane.
- Select Create Role.
- Select the SAML 2.0 Federation
- Choose the Okta_Connect_Admin from the SAML provider dropdown.
- Select Allow programmatic access and AWS Management Console Access.
- Choose Next for Permissions.
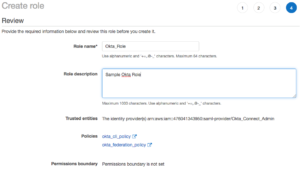
- Enter okta for filter policies.
- Select the two policies that were created.
- Select Next for tags, Next for review, and enter Okta_Role for Role name.

Avoid Contact Center Outages: Plan Your Upgrade to Amazon Connect
Learn the six most common pitfalls when upgrading your contact center, and how Amazon Connect can help you avoid them.

- Create the role and return to the Okta tab.
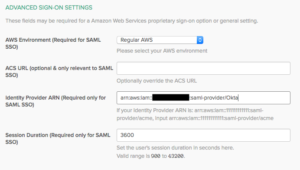
Advanced Sign-On Settings
- Paste the Identity Provider ARN that you copied into the Identity Provider ARN field.
- Choose Done. The app is now built!
Creation of an Amazon Connect instance has an associated IAM user which contains a credentials file that will be used to provide Okta with programmatic access. Refer to How to get credentials of an IAM role for use with CLI access to an AWS account – AWS Single Sign-On (amazon.com).
We are now going to provide Okta with programmatic access.
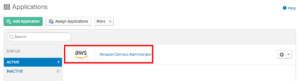
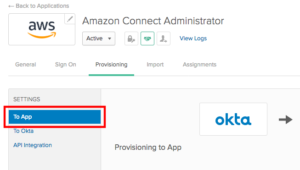
- Select Applications within Okta.
- Choose the newly created Amazon Connect Administrator app.
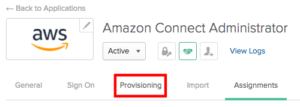
- Select Provisioning.
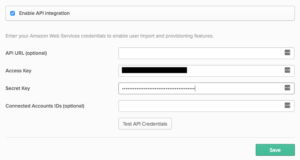
- Select Configure API Integration.
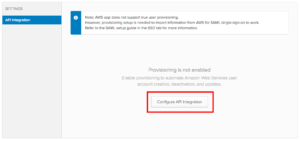
- Select the Enable API Integration checkbox and paste the access key and secret key from the credentials file into the appropriate locations.
- Select Test API Credentials and upon successful verification, choose Save.
- Select To App.
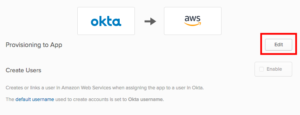
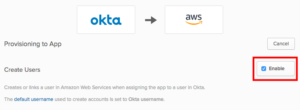
- Choose Edit and enable Create Users.
- Save all changes.
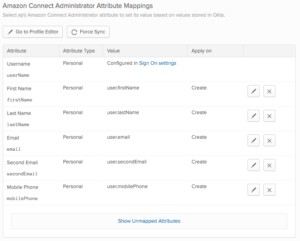
Once the page refreshes, you should see a list of Attribute Mappings at the bottom of the page.
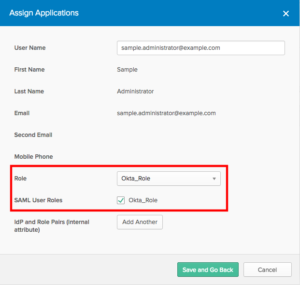
Assigning Users
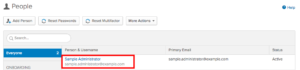
- As an Okta Administrator, choose Directory.
- Choose the admin user that you configured when you built your Amazon Connect instance.
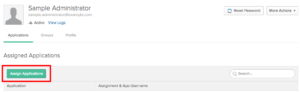
- Choose Assign Applications.
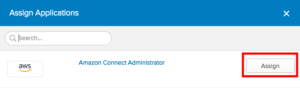
- Select Assignnext to the Amazon Connect Administrator application.
- Select Okta_Role from the Role dropdown.
- Choose the SAML User Roles Okta Role.
- Select Save and Go Back.
- Choose Done.
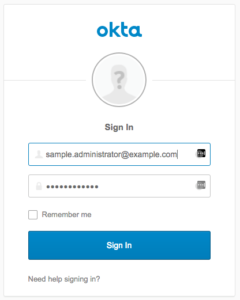
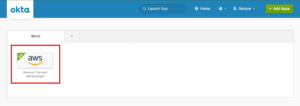
You are now ready to test the application!
- Login to your Okta account as Administrator.
- Choose the Web app that was created. A new tab will open and performs the authentication then redirects to the Amazon Connect Instance URL.
Okta as a Solution Leader
Okta has proven to be a leader in identity management for connecting any application to any device. This platform is well equipped to target a wide range of organization-specific applications and to deal with unique challenges based on technology growth. With so many organizations shifting to the Okta solution, it is a wise choice to mitigate security risks, management, and development effort(s) for onboarding applications that undergo continuous improvements and integrations.
Contact Us
At Perficient, we are an APN Advanced Consulting Partner for Amazon Connect which gives us a unique set of skills to accelerate your cloud, agent, and customer experience.
Perficient takes pride in our personal approach to the customer journey where we help enterprise clients transform and modernize their contact center and CRM experience with platforms like Amazon Connect. For more information on how Perficient can help you get the most out of Amazon Lex, please contact us here.