
Introduction:
“DevOps” is the combination of tools and technologies that helps organizations deliver applications with minimal effort and in a shorter period of time.
In this blog, I have implemented a DevOps strategy by integrating Github, Jenkins, and Docker to deliver small Java-based applications.
Project Architecture:

Tools Used:
- Tomcat:
Tomcat is an open-source web server used to run Java-based applications. It is the most widely used web server, in which we have to move the .war file to the /webapps directory and then Tomcat will install the .war file automatically and deploy the application. By default, tomcat runs on port 8080.
- Jenkins:
Jenkins is an automation tool that is mainly used to automate tasks that take more time when done manually. Jenkins supports several plugins to integrate third-party tools or software. Jenkins builds and tests your source code continuously, which would make it easier for developers to make changes while developing any software.
- Docker:
Docker is a software which uses an advanced version of OS-level virtualization called containerization. It allows us to build, test, and deploy our application quickly. It bundled software packages into containers.
Detailed Steps:
- Launch EC2 instance for docker host:
Launch an EC2 instance for docker host. Port 8090 should be open in the security group as we will be accessing our app on this port. After docker installed we need to start the docker service and check the status of docker service with below commands
Commands:
- yum install docker -y
- service docker start
- service docker status
- Creation of docker user:
To perform the Docker management task, we must first create a docker user and add him to the docker group.
Commands:
- useradd dockeradmin
- passwd dockeradmin
- usermod -aG docker dockeradmin
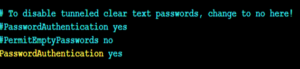
- Enabling Password based authentication:
To enable Jenkins to deploy war files to the Docker host, we must enable password-based authentication. For this we need to make certain changes in ssh configuration file.
Command:
- vi /etc/ssh/sshd_config
Here, in this config file we have to uncomment PermitRootLogin and PasswordAuthentication
After making changes to the sshd_config file, we need to restart the sshd service to reflect the changes we made.
Command:
- service sshd restart
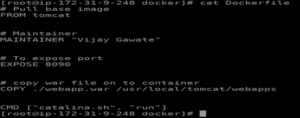
- Creation of Dockerfile:
We have to create a Dockerfile which will download the Tomcat base image from dockerhub and copy the war file generated in the /opt/docker directory to /usr/local/tomcat/webapps path.

Commands:
- cd /opt
- mkdir docker
- vi Dockerfile
Dockerfile content should look like this:
- Launch ubuntu instance and install Jenkins on it:
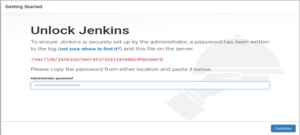
- Access the jenkins with a public IP in the browser.
- Copy path mentioned in below snap “/var/lib/Jenkins/secrets/initialAdminPassword”.
- Run command on server as “cat /var/lib/Jenkins/secrets/initialAdminPassword”.
- You will get initial password copy it and paste on Jenkins’s console.
- Install suggested plugins.
- Create admin user.
- Install Publish Over SSH plugin in Jenkins:
- On Jenkins console click on “Manage Jenkins”.
- Click on “Manage Plugins”.
- On available tab search for “Publish Over SSH”.
- Install without restart.

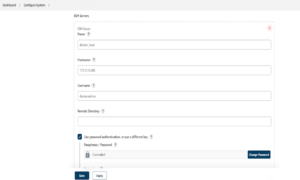
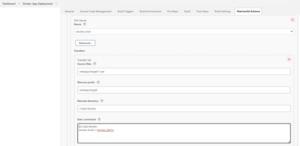
- Adding docker server in Jenkins:
We need to add a docker server in Jenkins so that Jenkins can deploy war files onto the container.
- On Jenkins console click on “Manage Jenkins”.
- Click on “Configure System”.
- At the bottom, click on “Add SSH” tab
- Enter the dockeradmin as username, password, and private IP address of the Docker server here.
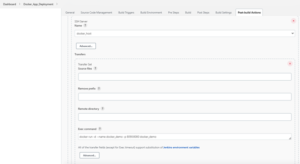
- Creation of Jenkins job:
- On Jenkins console click on “New Item”
- Select freestyle job and ok.
- In source code management, add git url as “https://github.com/Vijaygawate/docker_app_deployment.git”
This is demo repo I have created for this project. - Select branch as “main”.
- In build section add “clean install package” under goals and options.
- In post build action, add “cd /opt/docker” and “docker build -t docker_demo .” under exec commands section.
- Add again post build action and mentioned command to create container from the build image.
command: docker run -d –name docker_demo -p 8090:8080 docker_demo
- Building Jenkins job:
With the above configurations build the Jenkins job and we should have successfully built our job.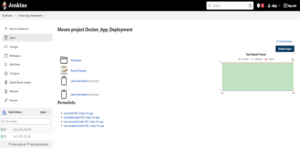
- Accessing app on browser
Access the app with below url
<Public_ip_of_docker>:8090/webapps
And we will be able to see app content
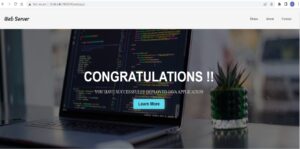
Conclusion:
As we can see from the above approach, the java application has been successfully deployed on tomcat server in docker container. Also, with this approach, we can reduce the time for deployment of any application.
Extremely useful information, Good work!
Very well written, framed and nicely explained the major points.