
My favorite feature of Sitecore XP is Progressive Profiling. You can setup models of visitor behavior, tag content and Sitecore will use math to determine which pattern of behavior they are most closely exhibiting. And that can be used to drive personalization, helping really model personas and journeys directly in Sitecore.

Sitecore’s Demo sites usually have a pretty cool sidebar that reveals details about the current visitor and what behavioral profiles are being matched.
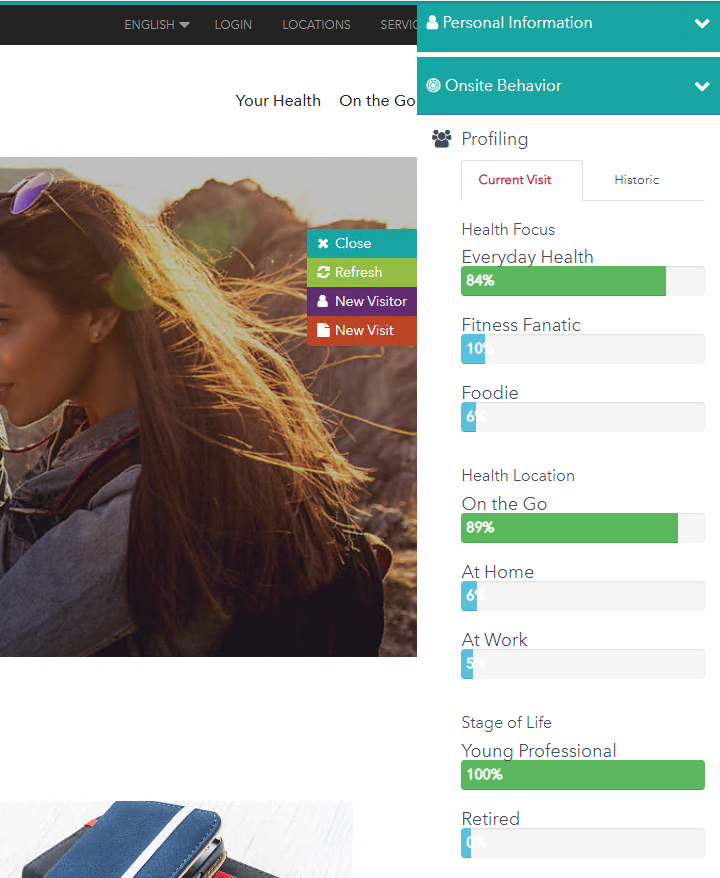
This is all great data and insights into the visitor’s behavior. I thought it would be interesting and useful to leverage this data from Sitecore Personalize to drive Web and Full Stack Experiences.
The Plan
It helps to have a plan in mind for proving out a concept. To make it easy, I decided to use Sitecore’s Lighthouse demo, which is a SXA sample site that leverages XP features and comes with built in Pattern and Profile Cards. To make this work, I planned the following steps:
- Get the Behavioral Profile Data from Sitecore XP to Sitecore CDP using the streaming JavaScript API’s
- Create an Offer Template with Offers for each of the possible Pattern Matches with content to drive a CTA
- Create a decision model to determine which offer to use based on the Data from XP
- Create a web experience that Shows an Alert bar with content from the selected offer.
Step 1: Getting Data from XP to Sitecore CDP
In order to use these Pattern Matches to drive web experiences in Sitecore personalize, we need to push this data using Sitecore CDP’s streaming API’s. These streaming API’s are JavaScript based, so really we need to do is be able to populate a JavaScript object with details from the Sitecore Tracker, the context object where you can get details about your visitor including behavioral data.
Normally I would create a custom component that evaluates the tracker and emits the proper JavaScript. But I noticed that the Lighthouse Site has that side bar component that displays the current site’s behavior. The code for that is actually in the “Demo” feature, which actually has a pretty involved library that makes dealing with the data easier and if I ever get around to creating a reusable component, I’ll probably lift most of that code.
For proof of concept purposes I edited the “_OnsiteBehaviorProfiling.cshtml” file to emit an additional Script tag. (Yes, I know global JS variables aren’t best practice, but again “Proof of Concept”)
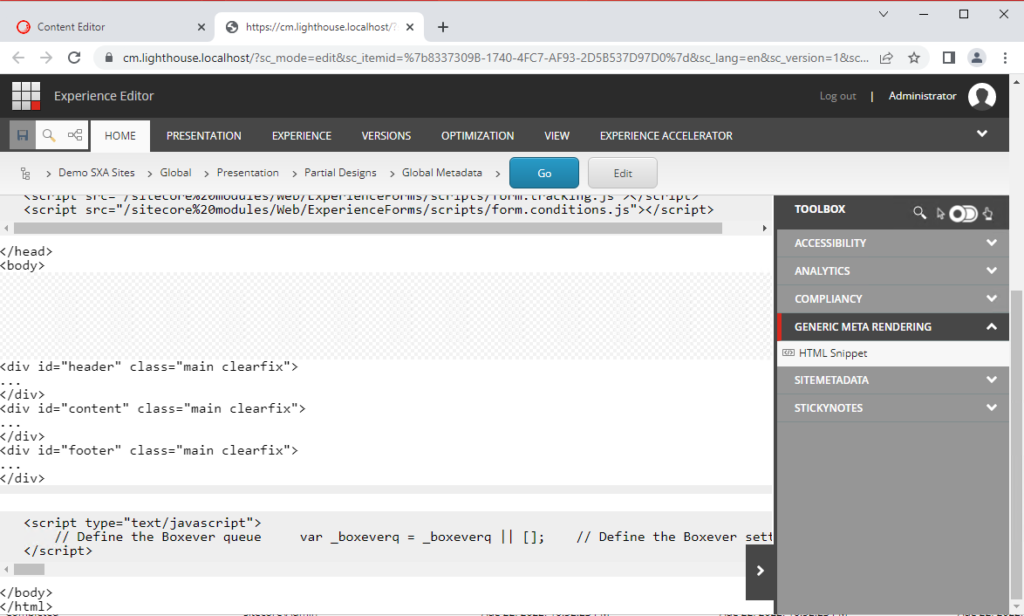
To Push this to Sitecore CDP, I needed to add JavaScript to the end of the page. I did this by editing the Global Meta Data Partial which is used by all the Lighthouse sites.
To get Sitecore CDP and Personalize working with your site, this script will need to activate the JavaScript library as detailed in the documentation examples.
<script type="text/javascript">
    // Define the Boxever queue
    var _boxeverq = _boxeverq || [];

    // Define the Boxever settings
    var _boxever_settings = {
        client_key: '{{clientKey}}', // Replace with your client key
        target: '{{apiTargetEndpoint}}', // Replace with your API target endpoint specific to your data center region
        cookie_domain: '{{cookieDomain}}', // Replace with the top level cookie domain of the website that is being integrated
        javascriptLibraryVersion: '{{javascriptLibraryVersion}}', // Replace with the latest Boxever JavaScript library version"
        pointOfSale: '{{pointOfSale}}', // Replace with the same point of sale configured in system settings"
        web_flow_target: '{{web_flow_target}}', // Replace with path for the Amazon CloudFront CDN for Sitecore Personalize"
        web_flow_config: { async: false, defer: false } // Customize the async and defer script loading attributes
};

    // Import the Boxever library asynchronously
    (function() {
         var s = document.createElement('script'); s.type = 'text/javascript'; s.async = true;
         s.src = 'https://d1mj578wat5n4o.cloudfront.net/boxever-{{clientVersion}}.min.js';\
         var x = document.getElementsByTagName('script')[0]; x.parentNode.insertBefore(s, x);
    })();
</script>
You’ll need to replace some of the values with details from your implementation. It was at this point, I needed to create a “Point of Sale” in Sitecore CDP + Personalize. This was easy enough to setup. Click on the Lower left corner of the menu area to open up the settings menus.
Then go to “System Settings” and then “Points of Sale.” Use an existing one, or create a new one. I created one called “Lighthouse” and used that value in the settings.
That script will connect your site to Sitecore CDP & Personalize. You can publish and load pages and check in visitors and notice you’re seeing activity being passed. Next step is to pass a custom event with the additional Pattern Details.
To do that, I just added some more JavaScript to the HTML Snippet. To pass an event with custom data, I followed this article, which shows that attributes can be added added to the ext property as key value pairs.
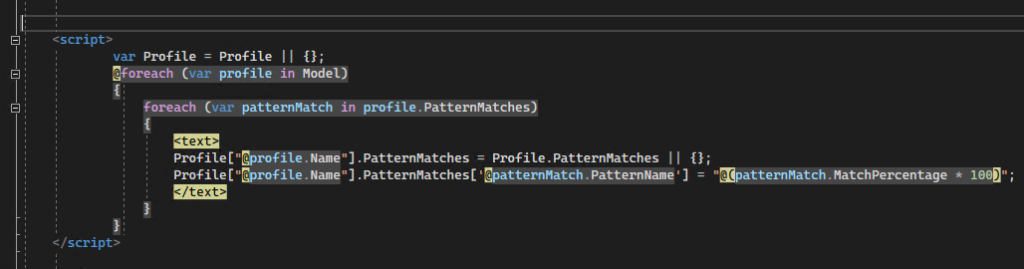
So to take the global Profile object I created in the “OnsiteBehaviorProfiling.chtml” page and get it to key value pairs, I wrote this code:
//Map Profile object to Data Extension Key Value pairs
var extData = {};
Object.keys(Profile).forEach(key => {
Profile[key].PatternMatches.forEach(element => {
var keyName = key+element.Name;
keyName = keyName.replace(/ /g,'');
extData[keyName] = element.Match;
});
});
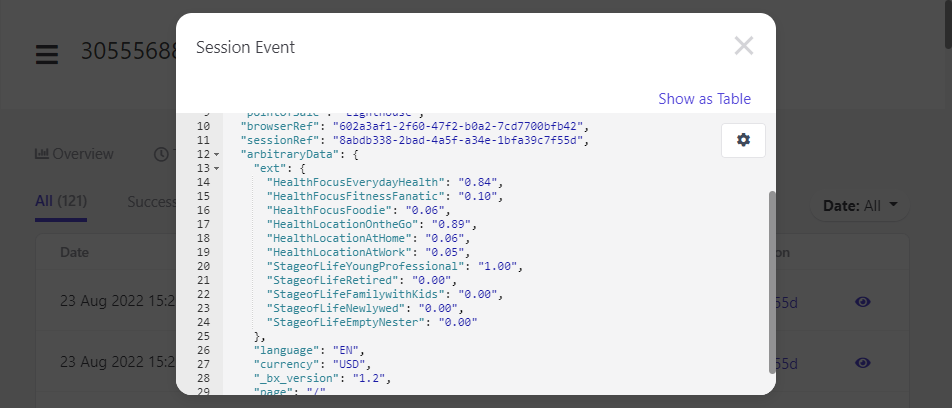
I flattened the key name to be a combination of the “Profile Name” and the “PatternName” and removed all the spaces to make it easy to consume in JavaScript once it was inside Sitecore CDP. For the values, I just took the Match Percentage. Now that I had the data ready to go, I just needed to raise an event.
// Place an anonymous function in the Boxever queue
_boxeverq.push(function() {
var profileEvent = {
"browser_id": Boxever.getID(),
"channel": "WEB",
"type": "VIEW",
"language": "EN",
"currency": "USD",
"page": window.location.pathname,
"pos": "Lighthouse",
"ext": extData
};
// Invoke event create
// (<event msg>, <callback function>, <format>)
console.log("Creating Profile Event");
Boxever.eventCreate(profileEvent, function(data){console.log("Profile Event Created");}, 'json');
});
After updating the Html Snippet and publishing it, I was now getting the view events with Profile details in Sitecore CDP.
Side Note
This didn’t actually work on the first try and took me longer than I care to admit to fix. I wasn’t seeing the View Events at all, only the Tracking events and it was driving me crazy. In the end the problem was I used the example from the documentation that used data from the DOM, which set the pos attribute to a substring of the host name. I eventually figured out pos stands for “Point of Sale” and should have been hard coded to the Point of Sale I set up, which in my case was “Lighthouse.”
Another note. I struggled at first with where to put the data. All the examples showed putting them in the event, which is attached to the session. I originally wanted to tie it to the guest, because, isn’t it really a property of the guest? Well the javaScript streaming API’s didn’t support updating the guest, though the rest Api’s did. I ended up going with the event, because when I saw how easy it was to iterate and get the data, which we’ll cover in detail when we talk about the decision model.
Step 2: Creating the Offers
Now that we’re actually tracking data from XP in Sitecore CDP, we can use it to drive an experience in Sitecore Personalize. To do that, I wanted to leverage Sitecore Personalize’s Offers capability. Sitecore Personalize was originally geared towards commerce scenarios, and offers were generally product offers. That being said, I like to think as Offers as the stand alone content that can be bound to different experiences. Offers are the “Data Sources” and Offer Templates are the “Item Templates.”
Given that, the first thing we need to do is define an offer template. I wanted to create different offers depending on which of the “Health Focus” Patterns was matched for a user. The offer itself would bind to an alert bar at the top of the screen, so I just wanted to define a few fields that could be used: Alert Message, Button Text and Button Url. To do that in Sitecore Personalize, Go to Library > Offer Templates and Add a New Offer Template.
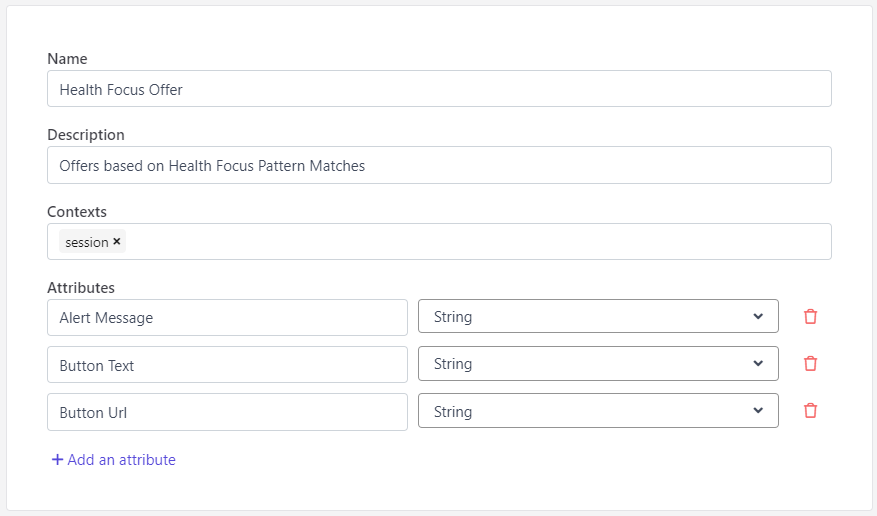

Add the fields that you need. For POC purposes, I only added the fields that I needed, but I would suggest making more robust templates with attributes that could bind to a wide number of web experiences, with all the fields needed to avoid having to create multiple templates and offers.
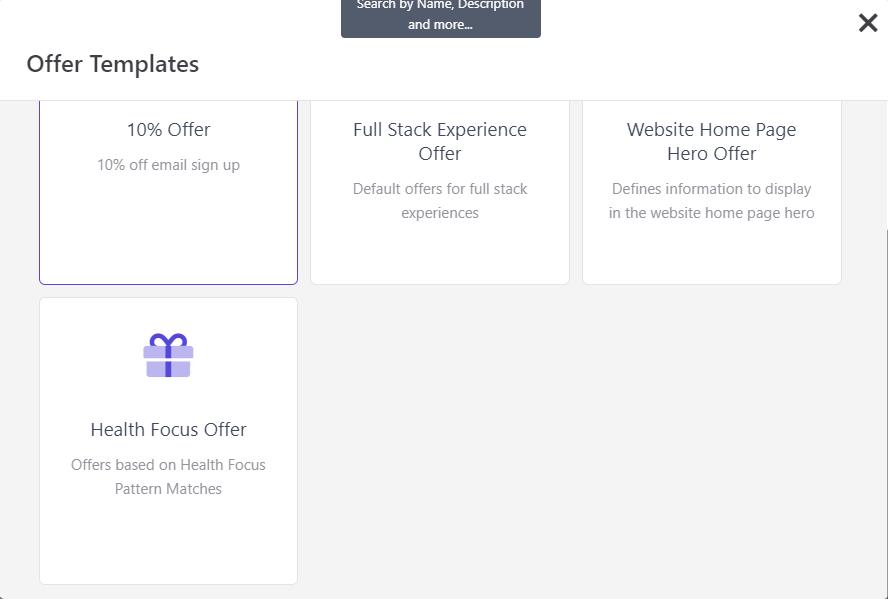
Next we’ll need to create the actual offers for each of the Health Focus Patterns. To do this, in Sitecore Personalize, go to “Decisioning” and then “Offers.” Click “Create Offer” in the top right and select the offer template you just created.
Name your offer and put in a description and then provide values for the attribute you defined. Later when we create the web experience, we will inject these values into the html template to display them.
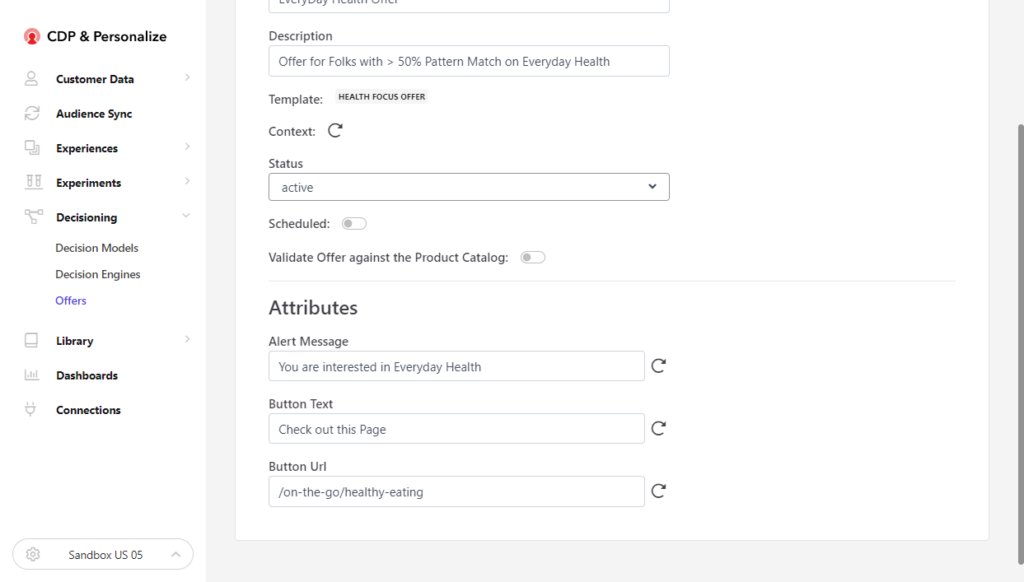
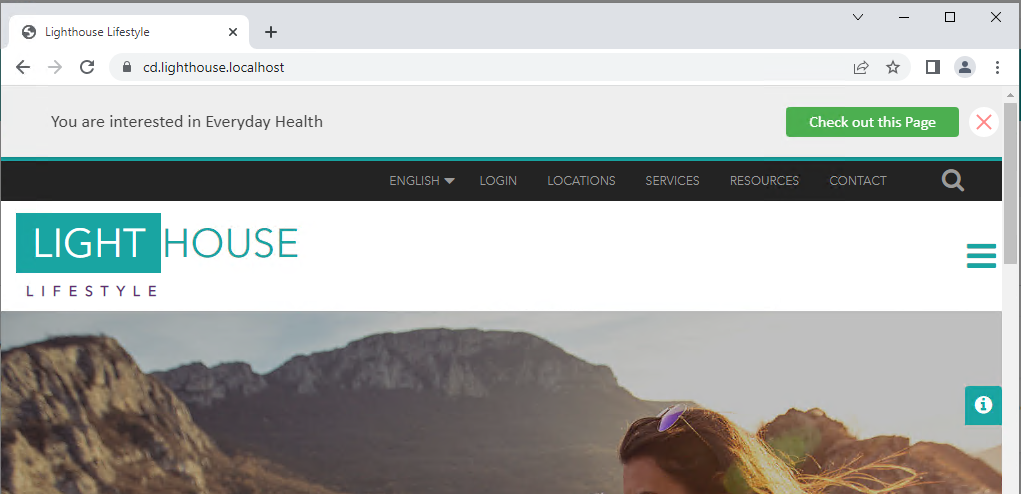
Repeat this process for each of the Pattern types you want to personalize for. For the Health Focus Profile I created offers for “Everyday Health,” “Fitness Fanatic,” “Foodie,” and a default offer in case none of the patterns were matched.
Step 3: Creating a Decision Model.
Now that we have the data in Sitecore CDP and the offers created, we need to create a decision model. The model will be responsible for looking through the visitors events, getting the profile data and figuring out which offer to use. To create one in Sitecore Personalize, we go to “Decisioning” and then “Decision Models.” Click “Create Model” in the top right and give your model a name.
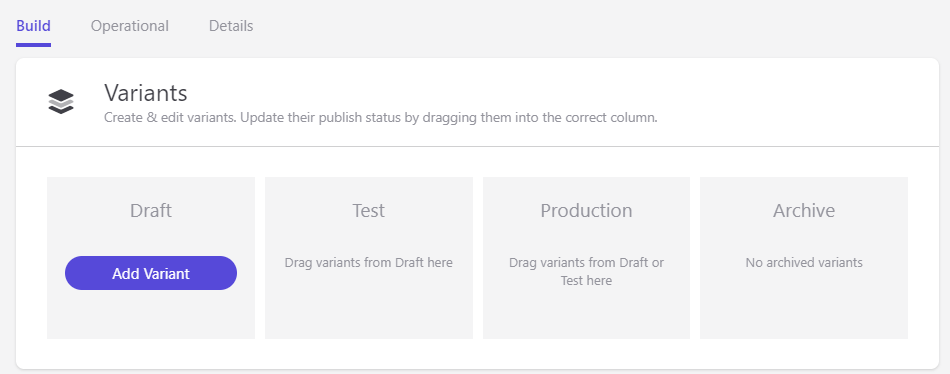
First thing you’ll want to do is click “Add Variant.” Name it “v1” or whatever you want to name it and then click into it to see the canvas.
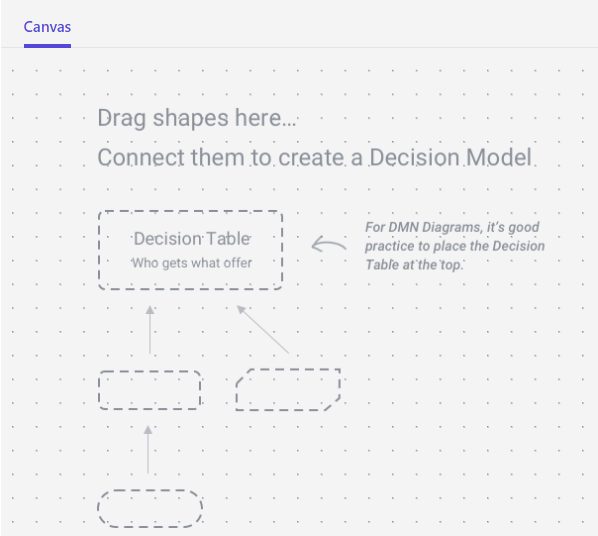
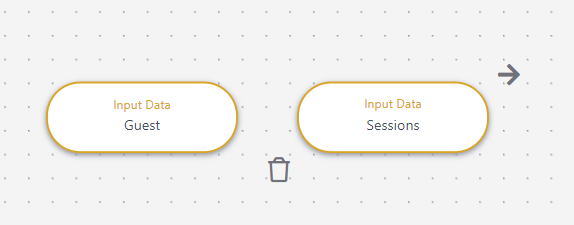
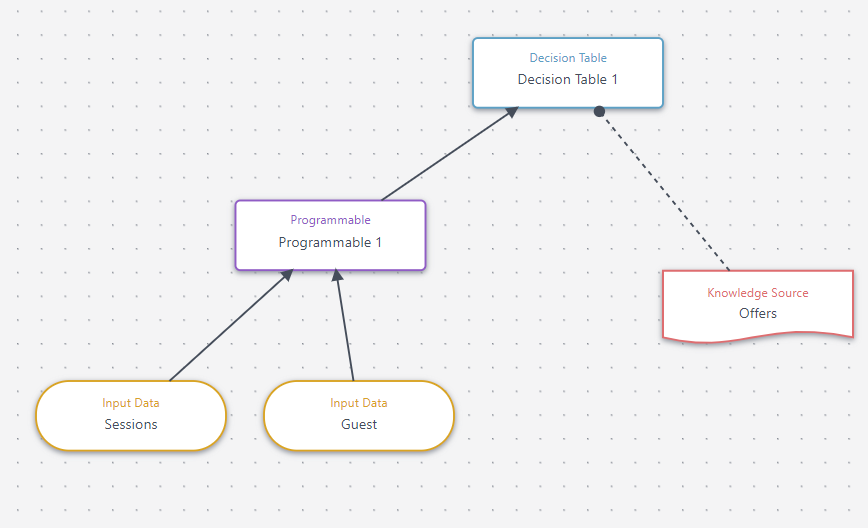
To create the model, we’ll need access to Guest and session Data. Drag those from the input Data section onto the canvas.
To do something with this data, we’ll need a Programmable. Drag it from the Decisions section onto the model. Then select each input, click the arrow and drag to connect to the programmable, making that data available to the JavaScript we will write.
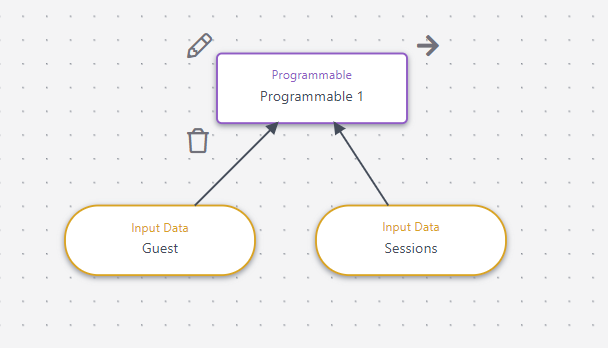
Now the fun part. We get to write some code. Click on the “pencil” edit button next to the programmable and you’ll see a javaScript editor. Notice on the right hand side a drop down for return type which should be set to string. To keep things simple, I’ll leave it as string but you should be able to play with different return types. This is important as we’ll use the output of this programmable in a Decision Table to select the offer.
For the javaScript itself, we want to iterate through the guest’s sessions, and for each session go through their views until we find the first view with our custom profile data. Once we do, we’ll evaluate the match percentage. If it’s greater that 50%, we’ll return the name of that pattern as a string. If none of them have a match, we’ll return default.
(function () {

  // Add statements here
    for (var i = 0; i < guest.sessions.length; i++) {
        var session = guest.sessions[i];
        print("Got Session");
        for (var j = 0; j < session.events.length; j++) {
            var event = session.events[j];
            if (event.type == "VIEW"){
                print("Found View");
                if (event.arbitraryData && event.arbitraryData.ext)
                {
                    var extData = event.arbitraryData.ext;
                    if (extData.HealthFocusEverydayHealth)
                    {
                        if (Number(extData.HealthFocusEverydayHealth) > .5){
                            return "HealthFocusEverydayHealth";
                        }
                    }

                    if (extData.HealthFocusFitnessFanatic)
                    {
                        if (Number(extData.HealthFocusFitnessFanatic) > .5){
                            return "HealthFocusFitnessFanatic";
                        }
                    }

                    if (extData.HealthFocusFoodie)
                    {
                        if (Number(extData.HealthFocusFoodie) > .5){
                            return "HealthFocusFoodie";
                        }
                    }
                }
            }
        }
    }
    print("no views");
    return "Default";
})();
Side Note:
As this was my first decision model, it took me a while to figure things out. Some hints: Use the “Test Canvas” function and load one of the visitors that you confirmed has the data for testing. It will quickly tell you whether or not you’re getting a JavaScript error. Use “Print” statements like you would “console.log” as they will show up in the “Test Canvas” as well letting you know where your code was having issues. Also note in test canvas it basically shows you the guest data that it’s binding to. That is how I figured out why it wasn’t working with event.ext and needed to use event.arbitraryData.ext to address it properly. In the end it’s just binding to the same Json you see for the guest, sessions.
Next we need to map the results of that programmable to an offer. To do that we need to drag a decision table to the canvas and then wire the programmable to the decision table. Then to use the offers we created, we need to drag the offers from the Knowledge sources onto the canvas and connect it to our decision table.
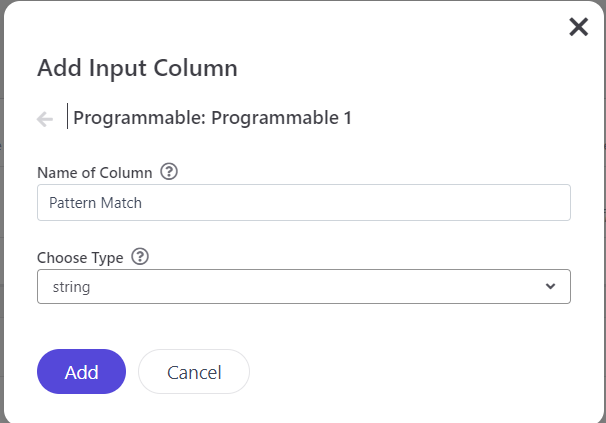
Now that the canvas is done, we can click edit next to the Decision Table to start configuring the rules. For the Input column, You’ll just want to take the result from the Programmable, give it a name and make sure the type is “string” like the result from the programmable.
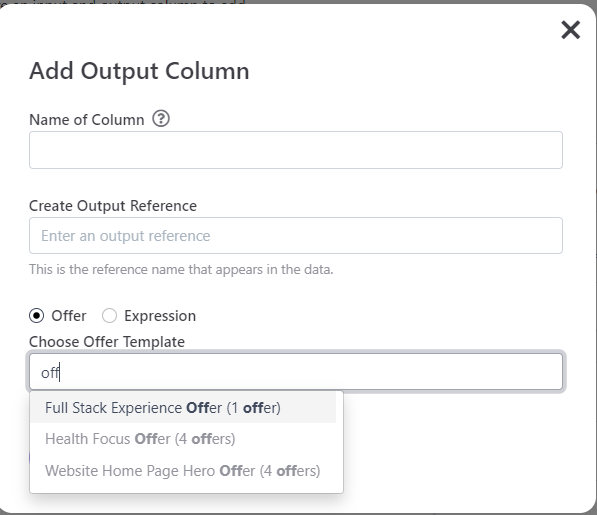
For Output column, you’ll want to give it a name, and select “Offer as the type”, selecting your offer template.
With that done, you can now map each of the pattern strings to offers.

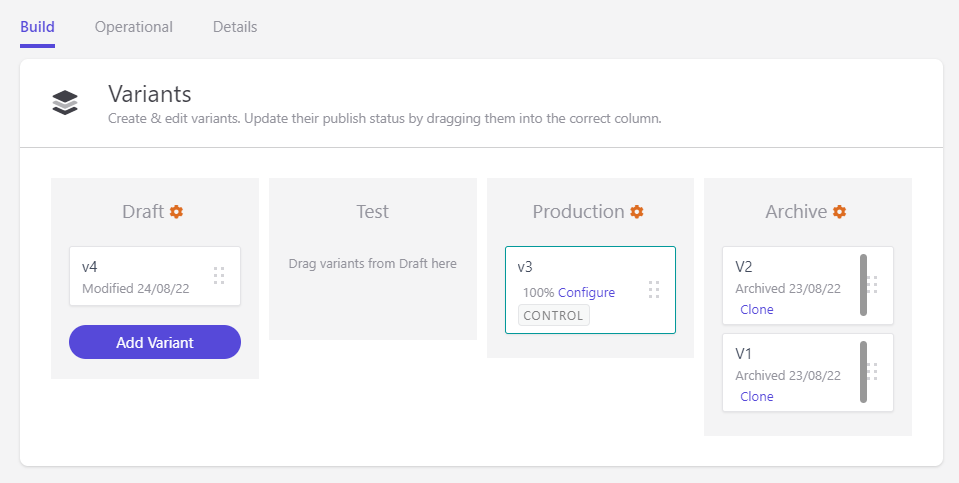
With that you configured, you’re decision model is ready to use. Don’t forget to move you variant to production by drag and dropping it from Draft.
As you can see it took me a few tries to get it working properly. One thing to consider is you can actually create multiple versions of your decision models with different logic or different offers, and then AB test them by putting them in production and allocating traffic to each model. This is another example of how powerful Sitecore Personalize can be.
Step 4: Creating the Web Experience
So we have the data in Sitecore CDP. We’ve created our Offers, and an Decision Model to select the right offer. Now we just need to create the experience. To keep things simple, I copied most of the code from the sample “Alert Bar” , lifting most of the code from the project on github.
To get started, In Sitecore Personalize go to “Experiences” and then “Web” and click “Create Experience.” Give it a name and click Ok. Select Empty Template if you haven’t created any.
As a starting point, copy and paste the HTML, CSS and JavaScript from the Github project.
To actually use the offer details, we’ll need to add a bit of javaScript to the “API” tab.
{
  "decisionOffers": ${toJSON(offers)}
}
I figured this out by copying one of the examples from the Play summit demo. I’m not sure if I could get this to work otherwise, but it works, so I’m not going to think any more on it for now.
Then on the html tab, replace the text, button url and message with attributes from the Offer like this:
<div id="bx_TopBanner">
    <div class="bx_TopBanner__banner">
        <p class="bx_TopBanner__p">
            <span class="bx_TopBanner__p--span" style="display: inline;">{{#decisionOffers}}{{#attributes}}{{[Alert Message]}}{{/attributes}}{{/decisionOffers}}</span>
            <a id="bx_TopBanner-button" class="bx_TopBanner__p--button" href="{{#decisionOffers}}{{#attributes}}{{[Button Url]}}{{/attributes}}{{/decisionOffers}}">{{#decisionOffers}}{{#attributes}}{{[Button Text]}}{{/attributes}}{{/decisionOffers}}</a>
        </p>
        <div class="bx__btn-close"></div>
    </div>
</div>
Note the need to use Brackets around the Attribute Names. This is needed since the attributes have spaces in them.
Lastly, on the JavaScript tab, I removed the button click event logic, as it works just fine as a normal anchor tag without javaScript.
When all that’s done, the only configurable elements of the experience in the right pane will be related to the styling and color, with the content coming from the offer.
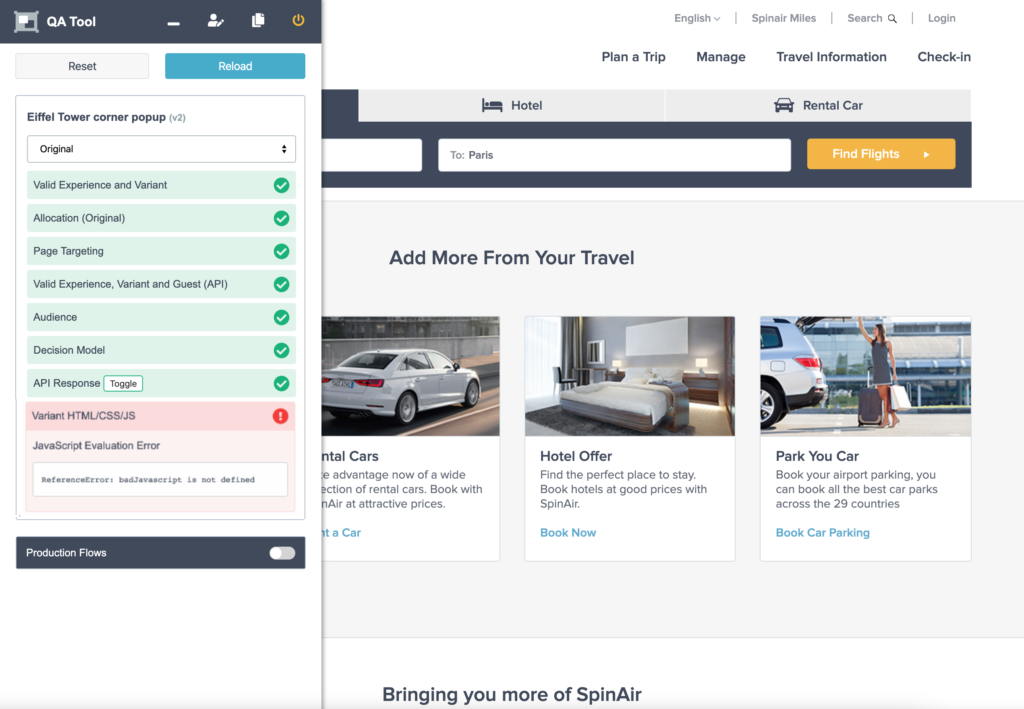
Side Note: Use the “Preview” feature:
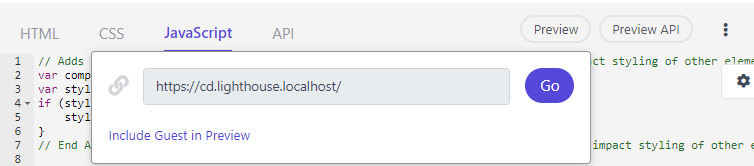
It will load your page with a side widget that allows you to troubleshoot what is going wrong. It provides details about issues in your template or your decision model, and was key to helping me get this working.
Wrapping Up
That was a long way to go, but it worked. There are probably ways to make this approach more reusable, optimized and generalized. From creating a reusable component that pushes the profile and pattern matches to CDP, to creating more reusable decision models and Programmable functions to process that data.
You also can use this data from other types of experiences: Trigger Experiences that drive different emails based on the latest pattern match; Interactive experiences that drive personalization in other applications. Don’t forget about experimentation too, and testing which experiences drive conversions for each profile.
If you’re interested in getting started with Sitecore XP, Sitecore Personalize or both, We’d love to help. Reach out to me on LinkedIn , Twitter or fill out our contact form.