
In Next JS, developers prefer most of their code to remain on the server side. However, it is quite tricky to accomplish such feats when you are working with forms. Components that require inputs from the user and thus must be client components to perform user operations like button clicks or text inputs. There useFormStatus comes.
So, let’s embark on this journey together to understand an experimental hook from react-dom: useFormStatus. This hook provides us with the details of the form it uses, like its loading state, the data held by the form at the point of submission, and its method and action.
Adding useFormStatus to your Project
As I have mentioned earlier, this is an experimental hook by react-dom. It will not be available with our usual npm install package installing command.
For this, we will have to run the command instruction in our terminal meant to install the experimental version of react and react-dom:
Installation
npm install react@experimental react-dom@experimental
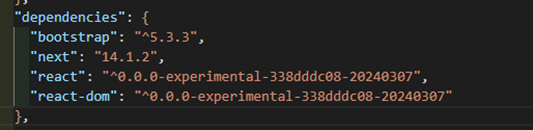
After installation of experimental packages, your package.json should have the dependencies as follows:
Once this is done, you should also create a file to let your project know you will be using the experimental utilities if you will be using typescript in your project:

After this, you should be able to import useFormStatus in your files and use them accordingly. You may have to add “//@ts-ignore” right above the import as typescript will not recognize this experimental import, but it will still work as it is intended to.
//@ts-ignore
import { useFormStatus } from "react-dom";
Creating a Simple Form
Let’s create a simple form with basic test inputs and a submit button to use this hook for its intended purpose.
<form action={onSubmit} className="form-control py-3 border-info">
<ProfileInput inputName="firstName" placeholder="First Name" />
    <ProfileInput inputName="lastName" placeholder="Last Name" />
<SubmitProfile />
</form>

Here, the inputName property of the ProfileInput component is important, as we will give this value to the input’s name property. We will then use that property to grab the values the user will enter in the form.
const ProfileInput = ({
  inputName,
  placeholder
}: {
  inputName: string;
  placeholder: string;
}) => {
  return (
    <div className="my-2">
      <input
        className="form-control"
        name={inputName}
        type="text"
        placeholder={placeholder}
      />
    </div>
  );
};
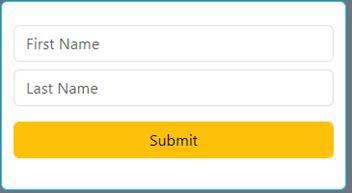
This is the output of our basic form so far:
As for the submit button, we will use an aspect of useFormStatus, which is the loading state. We get a Boolean value called “pending” from this hook. We can use this for disabling the submit button to avoid multiple forms submit calls or to change the text on the button like we have done here:
//@ts-ignore
import { useFormStatus } from "react-dom";

const SubmitProfile = () => {
  const { pending: isLoading } = useFormStatus();
  return (
    <div className="my-3">
      <button
        disabled={isLoading}
        className="btn btn-warning form-control"
        type="submit"
      >
        {isLoading ? "Loading..." : "Submit"}
      </button>
    </div>
  );
};
Notice how we do not pass any onSubmit or onClick function to the button? That is because although this is the submit button of our form, we are submitting the form through the action attribute of the html form component. In this way, we can execute a server action when we submit our form, meaning the code snippet that runs during the form submission can be from the server side, which, as I mentioned at the start of this post, is what we want for our Next JS project.
Action Attribute to our Form
Let me show you how the form’s action attribute helps us with this.
const InputForm = () => {
  const [profileList, updateProfileList] = useFormState(updateProfiles, []);

  const onSubmit = async (formData: FormData) => {
    const newProfile = await submitProfileAction(formData);
    updateProfileList(newProfile);
  };
  return (
    <>
      <form action={onSubmit} className="form-control py-3 border-info">
        <ProfileInput inputName="firstName" placeholder="First Name" />
        <ProfileInput inputName="lastName" placeholder="Last Name" />
        <SubmitProfile />
      </form>
    </>
);
In the snippet above, we are passing a function to the action attribute of the form, which usually takes a string path. But here, we can see that we are using the same attribute to execute a function with a parameter that supposedly includes the form’s data. The functions within the onSubmit function are the server actions that we want to execute when the form is submitted, so they will be in a file marked “use server.”
"use server";

import { Profile } from "./types";

export const updateProfiles: (
  oldProfiles: Profile[],
  newProfile: Profile
) => void = (oldProfiles, newProfile) => [...oldProfiles, newProfile];

const createProfile = (profile: Profile) => {
  return new Promise((resolve) => setTimeout(() => resolve(profile), 2000));
};

export const submitProfileAction = async (formData: FormData) => {
  const firstName = formData.get("firstName") as string || '';
  const lastName = formData.get("lastName") as string || '';
  return await createProfile({ firstName, lastName });
};
In the submitProfileAction, we are taking input values of our form with the get property in formData (which we got when we passed onSubmit to the action attribute in the form). This is why we gave values to name attributes in our inputs since we are using the same values from that name attribute to pick the data of the form we want.
This is the fascinating part, and the reason why we are using our form component in this way instead of the traditional onSubmit function passed to the submit button. The ability to perform server actions while using forms is quite beneficial to exploit while working on Next JS projects.
Let’s add some output for the form action:
return (
    <>
      <form action={onSubmit} className="form-control py-3 border-info">
        <ProfileInput inputName="firstName" placeholder="First Name" />
        <ProfileInput inputName="lastName" placeholder="Last Name" />
        <SubmitProfile />
      </form>
      {!!profileList.length && (
        <ul className="bg-light border-success form-control border-3 my-3 p-4">
          {profileList.map(({ firstName, lastName }: Profile) => (
            <li key={crypto.randomUUID()}>{`${firstName} ${lastName}`}</li>
          ))}
        </ul>
      )}
    </>
This should allow us to see how our form performs with server actions and a loading state provided by useFormStatus.
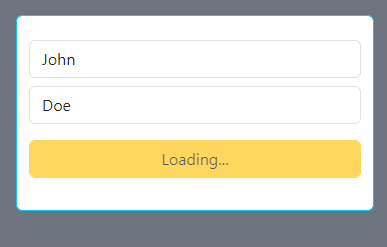
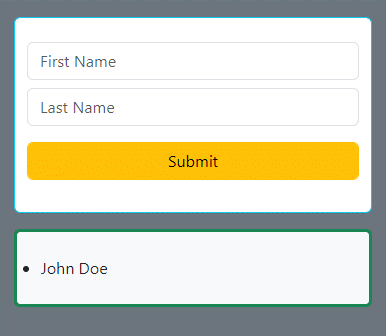
Output

Loading state after form submission
Result after the form is submitted
Conclusion
The useFormStatus hook simplifies form management in Next.js applications by abstracting complexity associated with form state management. This tool enables developers to create more maintainable and user-friendly forms. Streamlining the development process and enhancing the user experience in Next.js applications.