Hello Trailblazers!
With Salesforce Survey, gaining valuable insights and feedback from your audience becomes a seamless and insightful experience. In this blog post, we’ll learn how we can Automate Survey Invitations with the help of Flows.
This innovative capability empowers you to integrate surveys into your Salesforce Flows effortlessly, ensuring timely and targeted feedback collection. So say goodbye to manual processes and hello to a smarter, more automated approach to gathering and analyzing customer input.
Before you Begin:
This is the Part 4 of the Salesforce Survey Blog Series. You can go with these links if you are unfamiliar with “What is Salesforce Survey?” and “How to Send Salesforce Survey Invitations to Customers?”.
So, let’s get started.
Salesforce Flows
As we know, Salesforce Flow Builder has revolutionized business processes by providing a user-friendly, visual interface. It allows organizations to automate and solve complex workflows without the need for extensive coding. With its drag-and-drop functionality, Flow Builder empowers business users to design, execute, and manage complicated processes seamlessly.
So, here too, we are using these functionalities of Flows to automatically send Survey Invitations.
Create a Flow 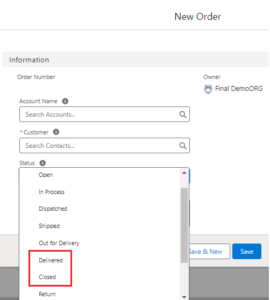
We have our Survey form ready, which is the “Shopping Website Survey,” which will survey for its Orders or Products. We have here a Custom Object “Order__c” and there is a custom picklist field called “Status__c”.
When the order status is “Delivered or Closed”, the flow automatically sends a Survey form to the respective customers.
Follow these steps to create a flow:
- Go to the Setup.
- Enter Flow in the quick find box and select “Flows”.
- Click New Flow.
- Select Record-Triggered Flow and click Create.
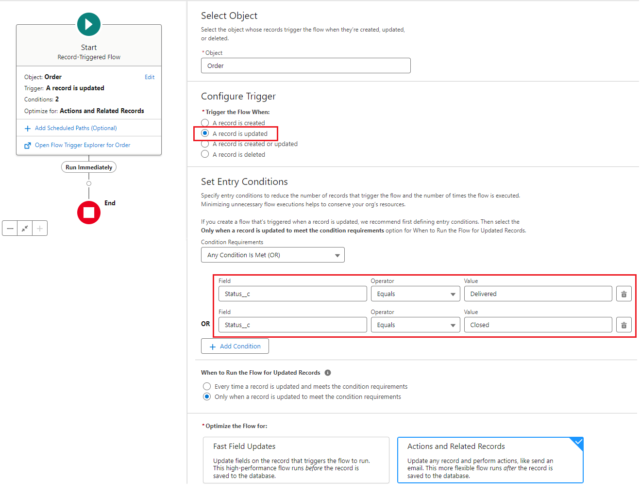
- Select Order as an object.
- Select A record is updated in the Configure Trigger Section. (As flow should trigger when the record will update to Delivered or Closed)
- For the Entry Conditions criteria, select Any Condition is Met (OR) and define the conditions as shown below:
Condition 1:-
Field: Status__c
Operator: Equals
Value: DeliveredCondition 2:-
Field: Status__c
Operator: Equals
Value: Closed - Select Only when a record is updated to meet the condition requirements once done with specified conditions.
- Select Actions and Related Records in the Optimize the Flow for section.
- Click Done or Click the “Close” sign at the top right as per the new updates.
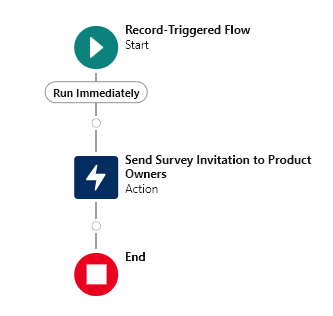
Your flow will look like this:

Add New Resources to the Flow
Here, we’ll create two resources that we will use to set up the flow.
- Click “Toolbox” at the extreme top-left beside the “Select Element” box.
- Select New Resource.
- Select Variable as the resource type.
- Enter Context as the API Name.
- For Data Type, select Text.
- In the Default Value, enter {!$Record.Id}.
- Click Done.
- Click New Resource.
- Select Variable as the resource type.
- Enter Recipient_mail as the API Name.
- For Data Type, select Text.
- In Default Value, enter {!$Record.OwnerId}. (This default value may vary. Remember that you have to send mail to the owner of that record only. So, it will be the Owner’s ID)
- Click Done.
Add an Action to the Flow
In this step, we’ll add an action to the flow that will trigger the survey invitation once an order is set to “delivered or closed”. But in this action, we will use our created survey.
Follow the below steps to create an action in Flow:
- In the Flow Builder page, click + under the Start element (below Rum Immediately) and select Action.
- In the New Action, keep the Category on “Filter By”, scroll down, and select Surveys. The available surveys will populate in the Action Search Bar.
- Select Survey. Here I’m selecting the “Shopping Website Survey”, that we’ve created in the previous part of this blog.
- In the label, enter “Send Survey Invitation to Product Owners”. API name will automatically be populated.
- In the Survey Subject field, select “Context”, a resource that we already created.
- For Recipient Type, select User in Your Org.
- For the Recipient value, select the created resource called “Recipient_mail”.
- After, select the Unique link checkbox.
It should look like this.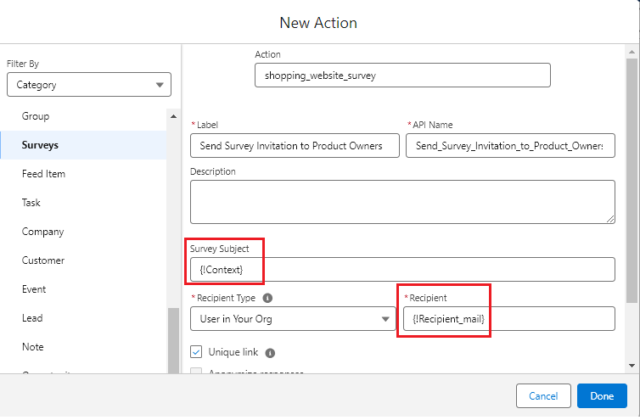
- Click Done.
- Save the Flow. Enter the flow label as “Automate Survey Invitation Flows”. Its API name will set automatically.
- Click Save and Activate.
Your flow will look like this…
Test the Flow
With this, we created a flow to send survey invitations automatically. Now, to test the flow, create an order and set its Status field equal to Delivered or Closed.
- Click the “App Launcher” icon.
- Enter “Orders” in the search box, and select Orders.
- Click New.
- Enter Order Name: “Test Order”.
- Select Status__c: “In-Process” and click Save.
An order will be created. - Again click on the same order, and update Status__c: “Delivered”.
Explanation
We implemented this approach because the flow is set to trigger “After the record is updated.” Consequently, when an order is created, it progresses through each status step, including in-process, shipped, and dispatched, until it reaches its final state of being delivered or closed. And, as the status condition matches to “Delivered or Closed”, the survey form will go to the product owner.
Otherwise, you can change the previous condition, i.e., Configure the trigger to “A record is created” for testing purposes only because this will directly hit the flow when you create a new record and the status condition matches.
Note: The flow we designed here specifically targets “Participants in your Company,” ensuring that only authorized users receive survey invitations, and not “Participants Outside your Company”. If there is a need to send invitations to external users, as previously discussed, you can refer to the below provided links for guidance.
So, in this way, we learned to send the survey forms automatically to the customers with the help of Salesforce Flows.
Thus, you can accumulate numerous survey responses and subsequently analyze them. How to do it? We already discussed it in the previous part of this blog.
Happy Reading!
“Expand your horizons with every click because reading is the gateway to continuous learning and growth.”