
Welcome back to getting to know Sitecore Search. Sitecore Search is an evolving product. Products are moving away from large monolithic products with long upgrade/release cycles to smaller composable products with shorter agile upgrade/release cycles. In this post, I’ll revisit several of my previous posts and make updates based on changes in the product and what I’ve learned over time.
Sitecore Search Admin Portal Url
Sitecore Search is part of the composable ecosystem of products. The URL has changed from the previous Reflection URL (https://cec.rfksrv.com/home) to the new Sitecore Cloud url (https://cec.sitecorecloud.io/home).
Sitecore Search UI (Part 1)
The Sitecore Search UI (aka CEC) has stayed mostly the same. It is now branded with the Sitecore Search logo instead of the Sitecore logo. The catalog has been renamed “content collection”. Catalog was a holdover name from the evolution from Discover which is more product-focused and made more sense in that context. The sources have been moved to the left sidebar instead of hiding under Administration. It’s a small change but makes a lot of sense to me. Get users where they want to go quicker. It still requires the TechAdmin or Admin role to access.

Updated CEC UI adds sources to the left navigation
Triggers (Part 4)
I had previously mentioned that a request trigger will only crawl the one URL specified. Also, I thought that was strange that a crawler would not actually crawl a site to find other pages linked from the given page. I accidentally had my max depth set at 0 and only got one document. Be sure to set your max depth and max urls on your web crawler settings to allow the crawler to discover pages.
Conversely, if you are using a sitemap trigger, you may want to set your max depth to 0 so that only the pages in the sitemap are indexed. If you want the crawler to crawl the pages in the sitemap for other pages that might not be listed in the sitemap, increase your max depth.
Document Extractors (Part 4)
As mentioned in this article, there are three types of document extractors. CSS, Xpath, and JS. A document extractor can have multiple extractors. Each extractor can set the type and list of URLs to match. This allows you to tag sections of your website differently. The CSS and Xpath selectors offer quick and easy access to your content, but they are less flexible and less powerful.
While you can change extractor types, it is likely best to use the JS extractor as your default. This allows you to add logic and do complex operations as your needs change. I’ll cover advanced document extractors in a future post.
It is nice to see that the document extractor has been updated to give feedback on errors as you type.
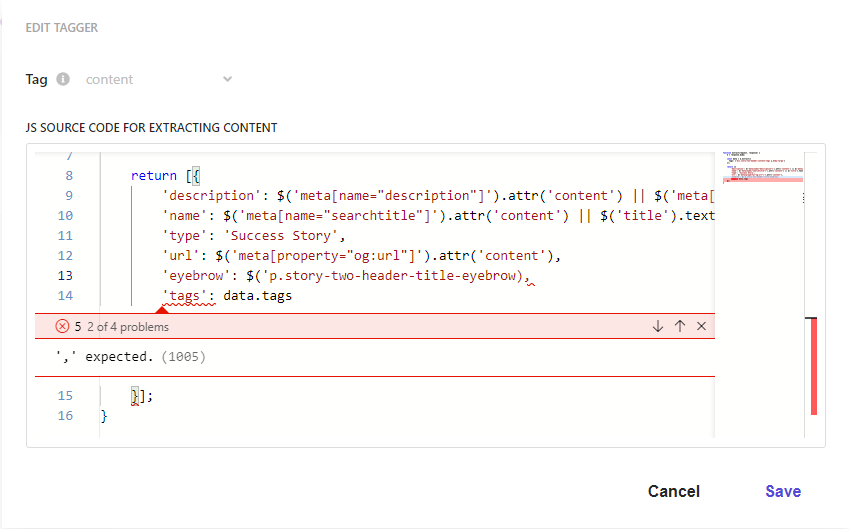
Document extractor gives errors in real-time
Documentation (Part 5)
Since I started this series, the official documentation for Sitecore Search has been released. It includes a developer guide as well as a Sdk guide for React. This new documentation does a great job of walking you through setting up your project to use the react SDK, using the CLI to create components, and how to style your components.
React SDK (Part 6)
The react SDK website is also continuously being updated. When I started, the SDK was in version 1.0-alpha. It upgraded to version 2 along the way. While the old versions still exist, you should always use the latest version.
It’s easy to add the react SDK to your project
- npm install –save @sitecore-search/react
- npm install –save @sitecore-search/ui
If you’ve installed an old version in the past, make sure to use the latest version
- npm install –save @sitecore-search/react@latest
- npm install –save @sitecore-search/ui@latest
Sitecore Search CLI (Part 6)

I discovered the Sitecore Search CLI by following the documentation for Sitecore Discover and guessing that the same existed for Search. Several people in the Sitecore Slack Search channel pointed me to the npm packages before the documentation was updated. The Sitecore Search CLI makes it fast and easy to add components to your React application.
It’s easy to add the Sitecore Search CLI to your project
- npm install –save-dev @sitecore-search/cli
If you’ve installed an old version in the past, make sure to use the latest version
- npm install –save-dev @sitecore-search/cli@latest
Creating Components With Sitecore Search CLI (Part 6)
The search sdk has updated the installation instructions. Look at the cli tab under installation for any widget. There are two dropdowns on the right that let you change cli settings to get the desired component. You can choose between typescript and javascript as well as several styling options.
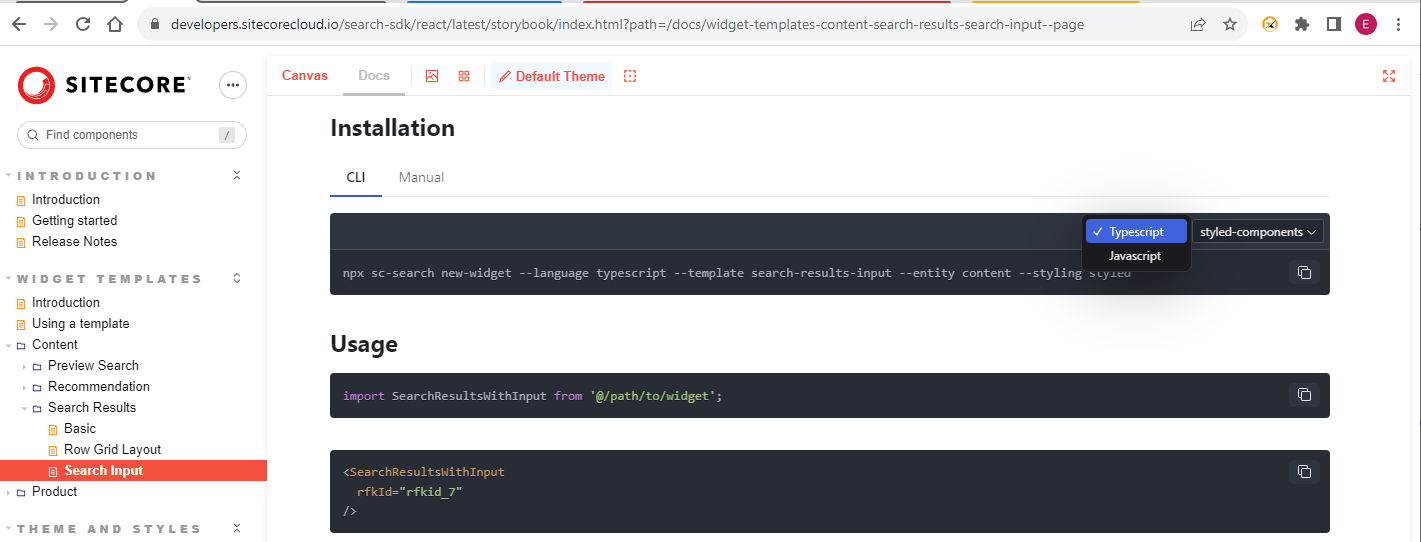
Storybook cli options for language

Storybook cli options for style type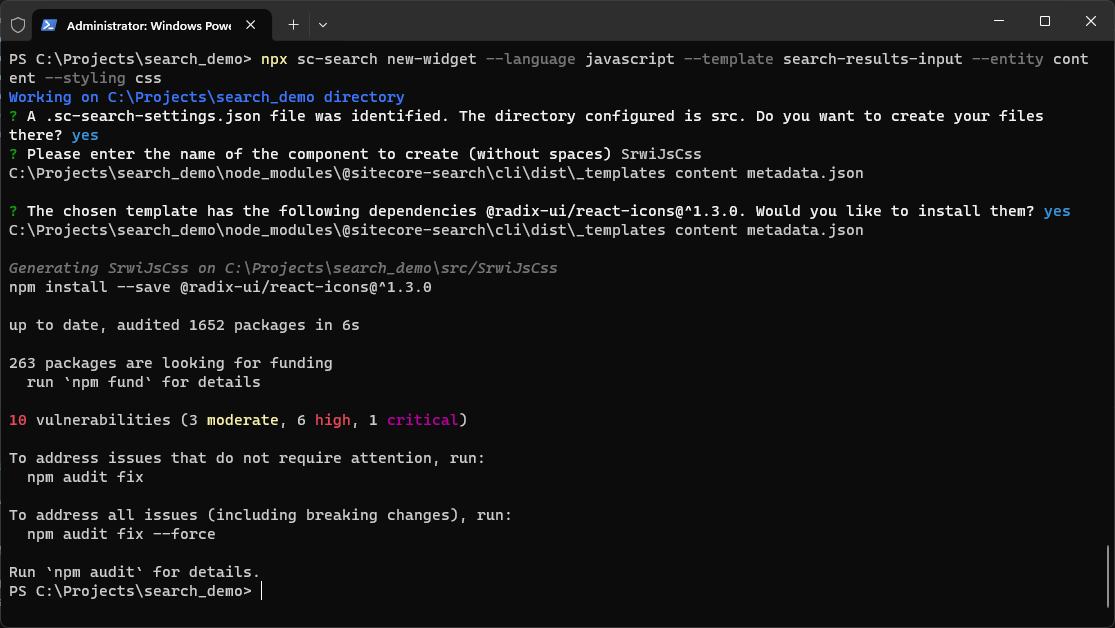
Sitecore Search CLI output for the new widget
Styling Components (Part 7)
When I wrote this article, I had very little React experience. I had not used styled components before. I had created widgets using the “styled” flag without giving it much thought. After this article was published, I chatted with Pablo Barrenechea from Sitecore. He showed me how to style the components correctly.
Styled-Components
If you create widgets with the “styled” option you will notice several things:
- Your react file will have named components
- <ArticleCardStyled.Title>
- You will have a styled.js file
- This file is a mix of javascript and CSS
- It creates React components that contain CSS
- The CSS is wrapped in backtick operators (https://styled-components.com/docs/basics#getting-started)
To style components, find the matching component name in the styled.js file and modify the CSS. Because the CSS is wrapped in the backtick operator, you won’t get typeahead and autocomplete (in VSCode), so watch for typos. Styled components create unique class names for your styles, which you see when you inspect the DOM of the rendered page. You do not have to inspect the dom and find the randomly generated class names to style your app!
CSS Components
If you create widgets with the “CSS” option you will notice several things:
- Your react file will have divs and named components with className attributes
- <ArticleCard.Title className=”sitecore-article-title”>
- You will have a styles.css file
- This file is your typical CSS file
To style components, find the matching class name in the styles.css file and modify the css as usual.
Sorting Options (Part 7)
Again, being new to React, I did not understand the defaultSortType property. I mentioned that I changed the value of the defaultSortType in the component file. But now I know it is a prop and you can pass it in when you use the component. You can pass in the other props for defaultPage, defaultKeyphrase, and defaultItemsPerPage as well.
<SrwiJsStyled rfkId=”rfkid_7″ defaultSortType=”best_match” defaultItemsPerPage={24} />
Final Thoughts
I have learned a lot about Sitecore Search and React since I started this blog series. In the beginning, I wanted to jump head-first into Sitecore Search. Looking back, some of the places I stumbled upon seem obvious now. I could have saved myself a little time by learning some of the basics of React and Styled Components first. But it’s all part of the journey!
Sitecore Slack
If you have questions about Sitecore Search or Sitecore in general, you should join Sitecore Slack! Interact with other community members as well as the product team behind Sitecore Search. Get direct answers to your specific questions.
Follow Me
Follow me on LinkedIn to get notifications as new articles are posted.