
The approval process in Salesforce is a very important topic and it plays a very important role for the approval of records before it comes to the actual processing. In this blog, we are going to learn the approval process very better with the help of real-time scenarios. So, let’s get started.
This is the Part 3 of the Approval Process Series.
Prerequisites:
If you’ve not gone through the previous part, Part 2 – A Beginner’s Guide to Building Approval Processes in Salesforce of this series, then go through this also. As we’ve taken the reference of the approval process example is solved in it.
Also, you can create an approval process of your own and follow the below scenarios to learn more.
Now, let’s go through some Real Time Scenarios: –
Scenario 1: – Can the User Edit the Submitted Approval Request?
No. Once an approval request is submitted, the user cannot edit it. But Salesforce gives you another way to deal with it. You can “Recall” the submitted approval process and edit it then.
Here are the steps to Recall =>
- Navigate to the approval process, click Edit, and then select “Initial Submitters” from the drop-down menu.
- Check the box “Allow submitters to recall the approval requests”.
- Click Save.
- Create a Leave Request record and submit it for approval. Make sure you won’t be able to edit it.
- Now, go to the related list. In the approval history-related list, click Recall.
- Write down any comment/reason for recalling. (optional)
- Click Recall.
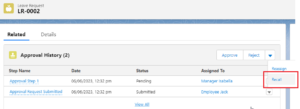
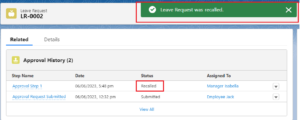
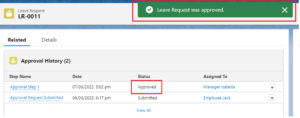
- The request has been successfully recalled. Make the necessary modifications now.
- To submit the request, click Submit for approval.
Scenario 2: Who will Approve the Request if the Approver is not Available?
In this case, the approver’s delegate will approve the request. Here, in the absence of Isabella, Senior Manager Robert will approve the request.
Here is the way to set up a delegate to approve requests =>
- Go to the User and click Edit in front of Manager Isabella.
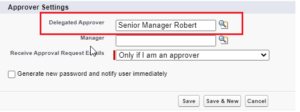
- Scroll all the way down to Approver Setting and enter “Robert” into the delegate approver box and click the search icon.
- Click on “Senior Manager Robert”. Click Save.

- Now, go to the approval process and, inside the Approval Process related list, click Edit to your recently created Approval Step.
- Go to Step 3 – Select Assigned Approver of it. Here check the box that says, “The approver’s delegate may also approve this request”.
- Click Save.
- Create a new record for Leave Request and submit it for approval.
- Log in as “Senior Manager Robert” in order to approve the request.
Note that, here you won’t be able to see the request in a notification or anywhere else. You must navigate to Leave Request records from App Launcher.
- You’ll see the Approve/Reject Buttons there.
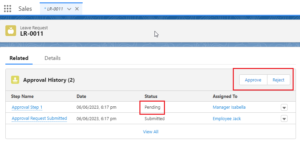
- Click Approve.
- Enter your comment if any and again click Approve.
In this way, an approver’s delegate can approve the requests.
Scenario 3: – If an Employee Requests more Leave, He must Obtain Approval from Both Approvers. How do I Implement this in the Approval Process?
Let’s consider, our Employee Jack is asking for more than 10 or 15 days of leaves then he will need approval from Manager Isabella as well as from Senior Manager Robert.
If the number of leaves is greater than 1, the request will be assigned only to Manager Isabella and if the number of leaves is greater than 10, it will be assigned to both Manager Isabella as well as Senior Manager Robert.
Note: Remove the delegate user from User: Manager Isabella.
To create such a scenario of both approvals, let’s begin with Multistep Approval Process.
A. Approval Step 1 – When Leave is Greater than 1.
- Create a new Approval Process. (Alternatively, you may just edit the approval steps in the ongoing process.)
- Go to the Approval Steps related list and click New Approval Step.
- Enter Name and Description. Click Next.
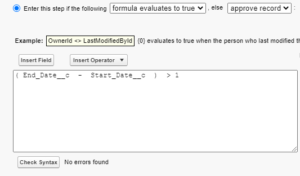
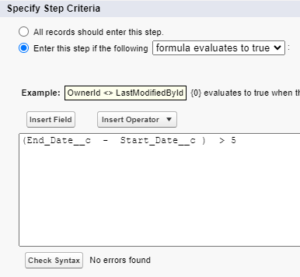
- Click on the second radio button and select “formula evaluates to true” from the first picklist and from ‘else picklist’ select “approve record”.
- Create the formula as shown below and check the syntax as well when done.
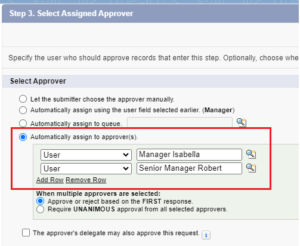
- Click Next. Here you can automatically assign to an approver. Select User from the picklist and from the second box, click on the search icon and select Manager Isabella.
- Click Save.
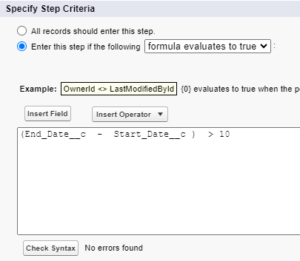
B. Approval Step 2 – When Leave is Greater than 10.
- From the Approval Steps related list, click New Approval Step, enter Name and Description and click Next.
- Create the formula as shown below and check the syntax as well when done.
- Click Next. Here you can automatically assign to an approver. Select User from the picklist and from the second box, click on the search icon and select Senior Manager Robert.
- Click Save.
In this Way, We’ve Created Approval Steps.

Create a new leave request and check that :-
- When the number of leaves will greater than 1 and less than 10, it will be assigned and approved by Manager Isabella.
- When leaves will greater than 10, it won’t be approved until and unless both managers approves it.
- And, when the number of leave is only 1, it will be directly approved without anyone’s approval.
Scenario 4: If Leaves are Less Than or Equal to 5, Assign it to Manager Isabella only. And, if Leaves are Greater than 5, Assign it to Senior Manager Robert only.
A. Approval Step – When Leaves are Less than or Equal to 5.
- Clone the approval process and give the name and unique name. Or you can simply edit the approval steps also.
- In the approval steps related list, click Edit.
- Enter the name and unique name and click next.
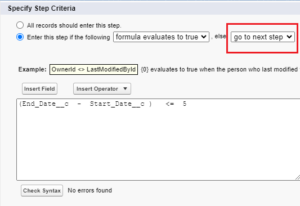
- Here, to the else picklist, select “go to next step”. It plays a very important role in the approval process. If the record won’t satisfy the formula condition, it will go to the next step and will be assigned to it.
- Create the formula as shown below and check the syntax as well when done. Click Next.
- Let the user Manager Isabella as it is and click Save.
B. Approval Step – When Leaves are Greater than 5.
- Click edit on the second approval step, enter name and unique name, and click Next.
- Create the formula as shown below and check the syntax as well when done. Click Next.
- Let the user Manager Isabella as it is and click Save.
In this way, we’ve created approval steps for particular assigning and approval of leave requests.

Create a new leave request and check. If the request will satisfy the first condition, it will only be assigned to Manager Isabella. If it satisfies others, it will be assigned to Senior Manager Robert only.
Scenario 5: If Leave is Applied, the Employee Wants it to Go for Approval by a Team. If One of them Approves, it Should get Approved.
- Clone the approval process and give the name and unique name. Or you can simply edit the approval steps
- In the approval steps related list, click Edit.
- Enter the name and unique name and click Save.
- In the approval steps, keep only approval step 1 and delete others. (In case you cloned the previous process)
- In approval step number 1, click
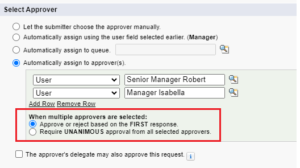
- Click Next and Next. In Step 3 – Select Assigned Approver, under the User drop-down menu click Add Row to add multiple users/new user.
- Click on the search icon and select “Senior Manager Robert” as a user as shown below.
- Below are the conditions when multiple users are selected.
A. In the case of the first option, when the request is submitted, it will go to all the selected users for approval. If any one of them approve or reject the request, then that record is marked as approved or rejected.
B. In the case of the second option, when the request is submitted, it will go to all the selected users for approval. Here it should be approved/rejected by all users. Then only it will be marked as approved/rejected.
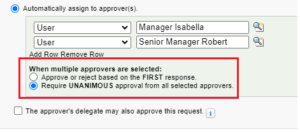
- Here, click the second radio button for the “Unanimous” user. Click Save.

The approval steps will be as shown below. - Click on “Activate” to activate the approval process.
Now Create a new Leave record and Submit it for Approval.
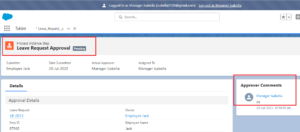
- Login as Manager Isabella. Check the approval request in the notification icon.
- Click on the record and click on “Approve” as shown below.
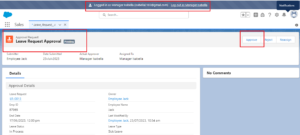
- Even if Manager Isabella approved it, the record’s status is still in a pending state. Because while creating approval steps we selected the “Unanimous” user. It is shown below:
- Login as Senior Manager Robert. Check the approval request in the notification icon.
- Click on the record and click on “Approve”.
- And now the record’s status will be finally “Approved” as shown below.

- In the same way, if you select the first option for the user while creating the approval steps, the record will be approved by the approval of any one of the users.
In this way, we’ve seen multiple scenarios of creating a “Multistep Approval process” using the “Standard Setup wizard”.
Conclusion:
In conclusion, implementing a multistep approval process in Salesforce brings numerous benefits to organizations, including streamlined workflows, improved accuracy, increased transparency, and enhanced decision-making. By leveraging Salesforce’s features and customization options, businesses can optimize their approval processes and drive greater efficiency in sales operations.