
Introduction
In the realm of software testing, precision and accuracy are non-negotiable. To achieve these goals, testers need robust tools that can validate their applications with finesse. Enter Katalon Studio, an automation testing tool that offers a wide array of features to streamline the testing process. In this comprehensive blog, we’ll embark on the journey of mastering Katalon Studio: Checkpoints and Visual Checkpoints, with step-by-step instructions on how to leverage these features for effective testing.
Note: To be able to use the checkpoint functionality, we need to have an enterprise edition license.
Understanding the Basics of Checkpoints
A checkpoint captures a snapshot of the data at a specific moment in time. It verifies whether the current data state matches the previous one. When creating test scripts in Katalon Studio, you can seamlessly insert checkpoints, which act as verification points during the execution process. These checkpoints ensure that your tests only pass when the application behaves as anticipated. Transitioning between different checkpoints in your script helps you validate specific functionalities and identify any deviations.
Transitioning from Checkpoint to Checkpoint
Furthermore, Katalon Studio offers versatile checkpoint options that allow you to validate static text and dynamic elements. Transitioning between these checkpoints ensures comprehensive test coverage and helps you catch even the subtlest issues.
Creating Test Data Checkpoints and using it in test cases
We will consider a login scenario and create login data for a website it will just include a username and password. Follow the steps to create checkpoints using Test data and validate the checkpoints:
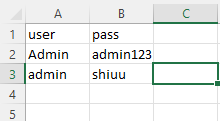
- Create an Excel File with username and password data as below
- Open Katalon Studio > Test Explorer > Data Files > Create new Test Data “LoginData” > Select data type “Excel”>Browse the Excel file > Check the checkboxes ‘Use first row as header’ and ‘Bind to test case as string’
- Select Checkpoints > Right-click on it > Create a new checkpoint
- Select ‘Test Data’ in Data Type, there are other options also available we can use like Excel, CSV file, Database, etc. > Select the “Login Data” test data > Click on the “Take Snapshot” button and it will show the snapshot of the data
- There are checkboxes in front of the data, click on the checkboxes of data you want to include as checkpoint for test case.

- Create a test case for the login scenario for the website > Add the keyword “Verify Checkpoint” at the first step > Select the checkpoint that we created and select “logChangedValue” as true, this will log a warning when there is a difference in test data and checkpoint value.
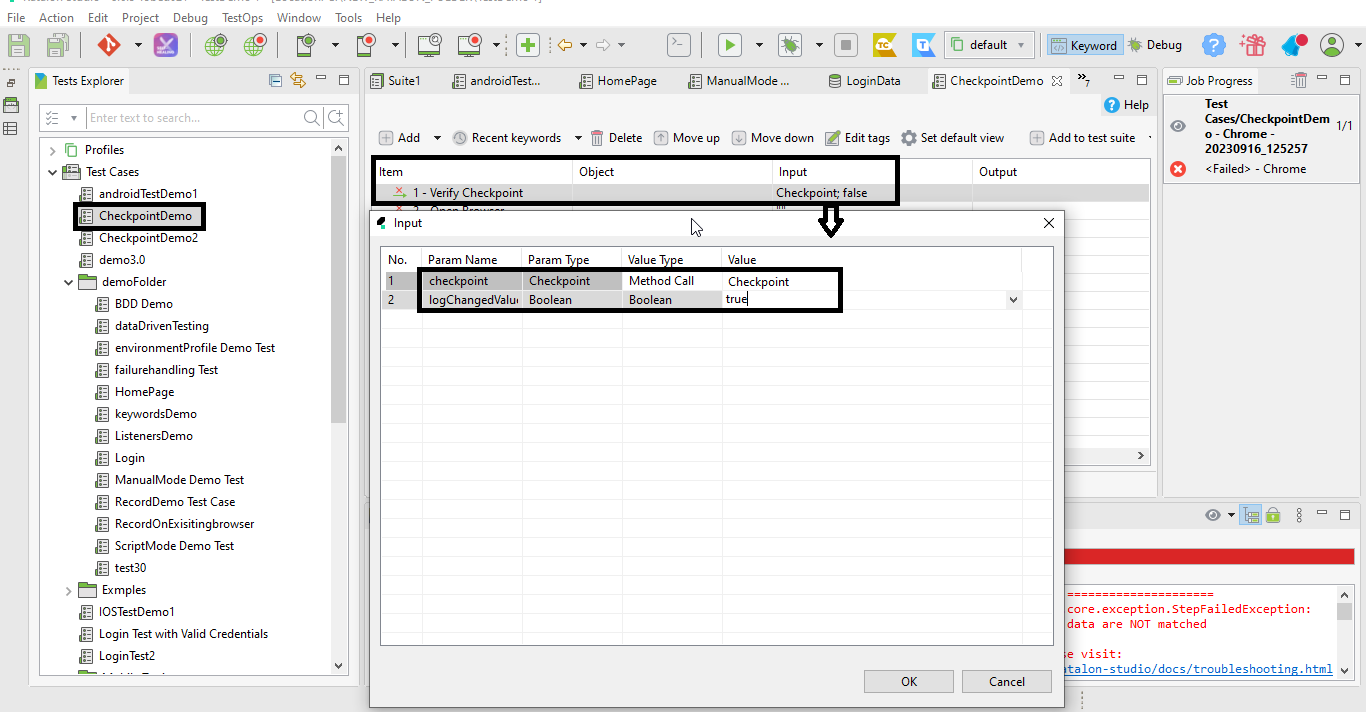
This way we can verify if there are any value changes in our test data using checkpoint. This is very useful when using external data and frequent data changes in test data.
Understanding Visual Checkpoints
Visual Checkpoints are a game-changer in ensuring the visual consistency of your web applications across diverse browsers and platforms. These checkpoints validate the visual appearance of web pages by capturing screenshots during test execution and comparing them against baseline images.
Step-by-Step Guide to Using Visual Checkpoints in Katalon Studio
Now, let’s delve into the practical steps for incorporating Visual Checkpoints into your testing workflow:
Step 1: Record a Test Case

Begin by recording a test case using Katalon Studio’s built-in web recorder. Alternatively, you can opt for manual script creation if you prefer more control.
Step 2: Insert Visual Checkpoints
Within your test case, strategically insert Visual Checkpoints keywords – ‘Take screenshot as checkpoint’, ‘Take element screenshot as checkpoint’, etc. at critical junctures where you want to verify the visual aspects of your application.
Step 3: Set Baseline Images
When you add a Visual Checkpoint for the first time, Katalon Studio will capture a baseline image, representing the expected appearance of the web page. This serves as the reference point for subsequent test runs.
Step 4: Execute the Test Case
Execute your test case across various browsers and platforms, ensuring comprehensive coverage. Visual Checkpoints will automatically capture screenshots during execution.
Step 5: Review Results
After test execution, Katalon Studio generates a detailed report. This report highlights any visual discrepancies detected during the test run. Review these results meticulously to pinpoint and address any visual defects.
Go to Katalon TestOps > Visual Testing >Visual Test Runs > check the results and screenshots
You can refer to the official documentation for more details: Use TestOps Visual Testing | Katalon Docs
Transitioning to the Conclusion
In conclusion, mastering Katalon Studio involves harnessing the power of Checkpoints and Visual Checkpoints. Checkpoints validate different aspects of your application, while Visual Checkpoints ensure the visual integrity of your web pages. Seamlessly incorporating these features into your testing workflow will elevate the precision and efficiency of your testing efforts.
Transitioning Forward: Elevate Your Testing with Katalon Studio
By diligently using Checkpoints and Visual Checkpoints in Katalon Studio, you can validate not only the functionality but also the visual appeal of your applications. This meticulous approach helps deliver high-quality software that not only works as intended but also provides a delightful user experience.
So, embark on your journey of mastering Katalon Studio, and let Checkpoints and Visual Checkpoints be your trusted allies in ensuring the flawless performance and appearance of your web applications.