Hello Trailblazers…
In the world of Salesforce development, Lightning Web Components (LWC) have revolutionized the way we build user interfaces. One of the key components in our toolkit is the Lightning Record Edit Form, which simplifies the process of editing records in Salesforce.
In this blog, we’ll delve into the ins and outs of the Lightning Record Edit Form component in LWC, using the Contact object as our example.
So, let’s get started…
What is Lightning Record Edit Form in LWC?
The Lightning Record Edit Form is a powerful LWC component that provides a simplified way to create, view, or edit a record in Salesforce. It handles data retrieval, display, and update operations, making it an essential tool for building user-friendly interfaces.

Creating a Lightning Record Edit Form in LWC:
Let’s start by creating a Lightning Record Edit Form for the Contact object in LWC. Here is a simple example of how to accomplish it:
RecordEditFormComp.html
<template>
    <lightning-card title="Record Edit Form Example" >
    <lightning-record-edit-form object-api-name={Contact_Object} onsuccess={handleSuccess} onerror={handleError} >
        <div class="slds-grid" >
            <div class="slds-size_2-of-2 slds-grid slds-wrap slds-form_horizontal slds-form" >
                <lightning-input-field field-name={FirstName} ></lightning-input-field>
                <lightning-input-field field-name={LastName} ></lightning-input-field>
                <lightning-input-field field-name={Email} ></lightning-input-field>
                <lightning-input-field field-name={Mobile} ></lightning-input-field>

            </div>
        </div>
        <lightning-button type="submit" variant="brand" label="Save Contact" class="slds-align_absolute-center"></lightning-button>

    </lightning-record-edit-form>
</lightning-card>
</template>
RecordEditFormComp.js
import { LightningElement } from 'lwc';
import {ShowToastEvent} from 'lightning/platformShowToastEvent';
import CONTACT_OBJECT from '@salesforce/schema/Contact';
import FIRSTNAME_FIELD from '@salesforce/schema/Contact.FirstName';
import LASTNAME_FIELD from '@salesforce/schema/Contact.LastName';
import EMAIL_FIELD from '@salesforce/schema/Contact.Email';
import MOBILE_FIELD from '@salesforce/schema/Contact.MobilePhone';


export default class RecordEditFormComp extends LightningElement {
Contact_Object = CONTACT_OBJECT;
FirstName = FIRSTNAME_FIELD;
LastName = LASTNAME_FIELD;
Email = EMAIL_FIELD;
Mobile = MOBILE_FIELD;

handleSuccess(event){
    const toastEvent = new ShowToastEvent({
        title : 'Success',
        message : 'Your Contact has been added successfully' ,
        varient : 'success'
    });
    this.dispatchEvent(toastEvent);
}

handleError(event) {
    let errorMessage = event.detail.detail;
    console.log("response",errorMessage);
    this.dispatchEvent(
        new ShowToastEvent({
            title: 'Error',
            message: errorMessage,
            variant: 'error'
        })
    );
}

}
RecordEditFormComp.xml
<?xml version="1.0" encoding="UTF-8"?>
<LightningComponentBundle xmlns="http://soap.sforce.com/2006/04/metadata">
    <apiVersion>59.0</apiVersion>
    <isExposed>true</isExposed>
    <targets>
        <target>lightning__RecordPage</target>
        <target>lightning__AppPage</target>
        <target>lightning__HomePage</target>
    </targets>
</LightningComponentBundle>
In this LWC Code:
- We use the <lightning-record-edit-form> component to create a form for creating Contact records.
- We specify the object-API-name attribute as “Contact” to indicate that we’re working with Contact records.
- Inside the form, we include <lightning-input-field> components for the FirstName, LastName, and Email, Mobile fields of the Contact object.
- We also include a <lightning-button> component for saving the changes.
- We import the necessary ShowToastEvent class from the Lightning Web Component framework.
- We define a method named handleSuccess to handle the success event triggered by the record edit form. Inside the handleSuccess method, we create a new ShowToastEvent and dispatch it to display a success message to the user. The same goes for the handleError event.
Output:
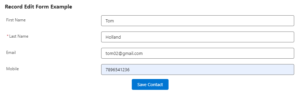
So, in this way we learnt to create lightning record edit form in Salesforce.
Conclusion:
In this blog post, we’ve explored the Lightning Record Edit Form component in Lightning Web Components, using the Contact object as our example. We’ve learned how to create a record edit form, handle success, and handle error events respectively.
Happy Reading…
Resources:
- Lightning Web Components Developer Guide
- Lightning Component Library
- Trailhead: Lightning Web Components Basics