
In part 1 of this two-part blog series on securing your local development with HTTPS and Self-Signed Certificates, I described how to create a local self-signed certificate. In this part, I’ll explain how to use that certificate to safeguard your development environment and make it even more similar to QA & Production.
Bind the certificate to HTTPS in IIS
When creating a site in IIS, you can bind the site to several protocols: http, https, ftp, etc. The first time you set up a site you’ll only be able to set up one and that’s probably HTTP.
If you have already set up the site, follow these initial steps.
- Open IIS Manager.
- Right-click on your pre-defined site and choose “Edit Bindings…”.
- Click “Add…”.
Otherwise, create a new site in IIS.
Instructions for IIS 8.0+
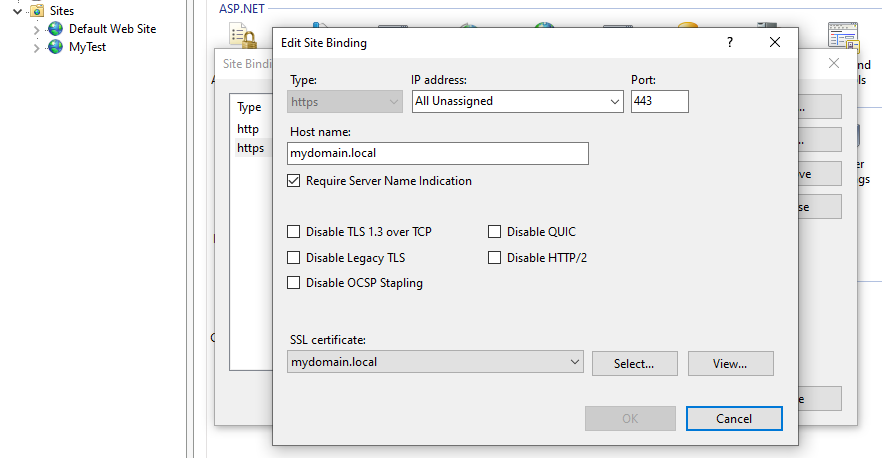
- Change the type to https.
- Leave the port as 443 unless you want to specifically designate a port number for your HTTPS connection. (If you have multiple sites, they can all use 443 without conflicts based on the next steps.)
- Enter the hostname. If also using HTTP, make this the same as that entry.
- Check “Require Server Name Indication”.
This will force IIS to only accept calls made to your hostname for this website and not “localhost:port” or any variation. This is key to ensuring that multiple sites on the same machine can all use the default 443 for their HTTPS port.
From Microsoft1:
ProblemAs more e-commerce sites come on line and more businesses are storing and sharing sensitive documents online, the ability to host and scale secure sites are increasingly more important. Prior to Windows Server 2012, there were a couple of challenges when it comes to hosting secure sites:SSL Scalability: In a multi-tenanted environment, such as a shared hosting, there is a limitation as to how many secure sites can be hosted on Windows Server, resulting in a low site-density.IPv4 scarcity: Because the network end-point can only be identified with IP:Port binding, where tenants request to use the standard SSL port, 443, hosting a secure site often means offering a dedicated IP address per tenant.SolutionOn Windows Server 2012, IIS supports Server Name Indication (SNI), which is a TLS extension to include a virtual domain as a part of SSL negotiation. What this effectively means is that the virtual domain name, or a hostname, can now be used to identify the network end point. In addition, a highly scalable WebHosting store has been created to complement SNI. The result is that the secure site density is much higher on Windows Server 2012 and it is achieved with just one IP address.It should be noted that in order for this feature to be used, your client browsers have to support SNI. Most modern browsers support SNI; however, Internet Explorer (of any version) on Windows XP does not support SNI.
- Continue down the screen and select your newly created certificate from the dropdown list.
- Click OK.
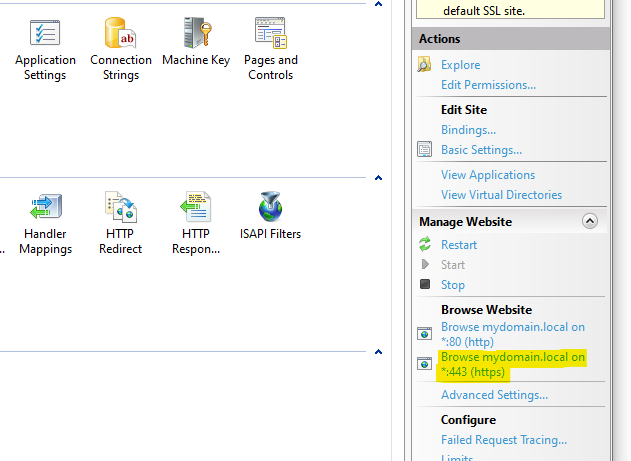
- With the site selected, on the right side of the window click “Browse {yoursite} on :443 (https)” and verify that it is working.

Instructions for IIS 7.5 (and earlier)
Unfortunately, IIS 7.5 (and earlier) doesn’t support Server Name Indication, so each secure site will need its own port number.
- Change the type to https.
- Designate a specific port for your site.
- Enter the same hostname as you had for HTTP.
- Continue down the screen and select your newly created certificate from the dropdown list.
- Click OK.
- With the site selected, on the right side of the window click “Browse {yoursite} on :{port} (https)” and verify that it is working.
Secure your Kestrel configuration
There are several ways to assign your certificate to your Kestrel setup (see reference 2). I will explain how to assign the certificate that you have saved in your Certificate Store.
1. Open appsettings.json.
2. Update the following code with the friendly name of your certificate. Remember, you can find the friendly name if you open
certmgr.msc (or Start > Manage User Certificates).3. Add the following code, updated with your friendly name, to your appsettings.json file. It should be aligned in the first level of the JSON file (same level as ConnectionStrings).
"Kestrel": {
    "Certificates": {
      "Default": {
        "Subject": "mydomain.local",
        "Store": "MY",
        "Location": "CurrentUser"
      }
    },
    "Endpoints": {
      "Default": {
        "Url": "http://mydomain.local" // HTTP fall-back
      },
      "SecureLocal": {
        "Url": "https://mydomain.local" // No certificate specified, so it will use the default
      },
      "MySecondDomain": {
        "Url": "https://second.mydomain.local",
        "Certificate": {
          "Subject": "mydomain.local",
          "Store": "MY",
          "Location": "CurrentUser",
          "AllowInvalid": (true or false whether you want to allow invalid certificates)
        }
      }
      "FrontEnd": {
        "Url": "https://mydomain.frontend.local",
        "Certificate": {
          "Subject": "mydomain-frontend.local",
          "Store": "MY",
          "Location": "CurrentUser",
          "AllowInvalid": (true or false whether you want to allow invalid certificates)
        }
      }
    }
Some notes:
- The “SecureLocal” endpoint doesn’t have a certificate specified and it will fall back to the default certificate.
- “MySecondDomain” shows how to set up a sub-domain using the default certificate (in part 1 I showed how to create a certificate with wildcard domains).
- “FrontEnd” shows how to set up a separate site within the same solution that uses a different certificate.
- The “AllowInvalid” setting should be set to “false” if possible. Setting it to true bypasses some of the security features you’re looking to gain by using a certificate.
- If the certificate was stored in the Local Machine instead of Current User, change the “Location” from “CurrentUser” to “LocalMachine”.
Microsoft has more configurations on this page (including how to use a .pfx cert): “Configure Endpoints for the ASP.NET Core Kestrel Web Server”.
Set up HTTPS for your local Optimizely environment
To ensure that you’re always hitting a secure Optimizely connection to your website, a couple of simple changes to the Admin section are needed.
In Admin > Config, we’ll set up the site using HTTPS when entering the URL.

This will create a primary type for the same hostname.

Edit this and set the scheme as HTTPS.
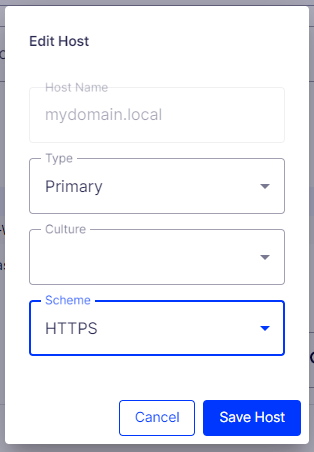
This will ensure that all pages in the editor will default to HTTPS. You can create an additional entry for HTTP, if you’d like it to be available, however, that would defeat the intention of making your local environment as close to production as possible.
Try accessing your site via HTTPS to verify that the settings and certificates work.
That’s all you need to be able to always have your local development environment secured just like QA and Production.
Part 1: Please visit “Local HTTPS for Optimizely, Kestrel, and SQL Server (Pt 1)” for instructions on how to create your local certificate.
In the future, I hope to add an addendum to this blog series about securing your local SQL Server instance to make your environment even more like production.
References
1 Shauneagan. (2022, August 23). IIS 8.0 server name indication (SNI): SSL scalability. Microsoft Learn: Build skills that open doors in your career. https://learn.microsoft.com/en-us/iis/get-started/whats-new-in-iis-8/iis-80-server-name-indication-sni-ssl-scalability
2 Microsoft.com. “Configure Endpoints for the ASP.NET Core Kestrel Web Server,” March 13, 2023. https://learn.microsoft.com/en-us/aspnet/core/fundamentals/servers/kestrel/endpoints?view=aspnetcore-7.0#replace-the-default-certificate-from-configuration.