
Wasn’t it around 2006 when HTTPS started becoming popular? You’d go to a secure page and almost always see a message saying, “This page contains both secure and nonsecure items. Do you want to display the insecure items?” 1

“Helpful” people online posted how to disable the error. Then browsers got smarter and just stopped delivering the non-secure mixed content altogether, relinquishing the error message to the console. 1
Why this trip down memory lane? Because it’s 2023 and some of us are still developing solutions in an unsecure HTTP environment!

One of the easiest ways to minimize UAT/production bugs is to make your development environment as close to identical to the UAT/production environment as possible (and feasible). Let’s start by making your local environment HTTPS-only.
Creating a Self-Signed SSL Certificate
Working on a local machine, we don’t want to spend the money or time going through the process of registering an SSL certificate with the ICANN lookup. They can’t verify https://localhost/mysite anyway. Luckily, we don’t need to. We can use a Self-Signed Certificate, or a Client-side Certificate.
Note: These instructions are for Windows-based computers
Certificate without password
- Update the following command with the name of your domain (we’re using “mydomain.local” as an example).
- Open a Powershell window with Admin rights and paste the updated command.2
New-SelfSignedCertificate -Subject "mydomain.local" -DnsName mydomain.local, *.mydomain.local -CertStoreLocation Cert:\LocalMachine\My -NotAfter (Get-Date).AddYears(10)
What do the switches do?
- -Subject: This will create a friendly name to reference the certificate when browsing the store.
- -DnsName: This is a key piece of information the system uses to associate a URL/domain with your certificate. Note that there are two entries: an explicit domain and a wildcard domain. The additional wildcard domain will allow you to build subdomains off the main domain without needing a new certificate.
- -CertStoreLocation: This is where the certificate is stored on your machine.
- -NotAfter (optional): This sets the certificate’s expiration date. In this case, we’re setting it for 10 years out.
We can use the certificate in a couple of ways:
Assign it to the Trusted Store
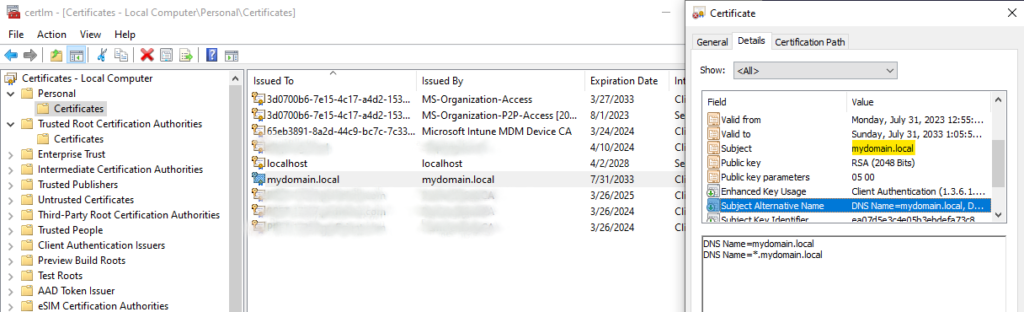
- At a Windows Run screen (Win + R), type “certlm.msc”. This will open the Local Machine’s Certificate Store.
- Open “Personal” > “Certificates”
- Find the certificate you just created.
- Copy it (Right click + Copy) and paste it inside the “Trusted Root Certification Authorities” > “Certificates” folder (Right click + Paste)
Export it as a file to be imported when needed
- At a Windows Run screen (Win + R), type “certlm.msc”. This will open the Local Machine’s Certificate Store.
- Open “Personal” > “Certificates”
- Find the certificate you just created.
- Right-click, choose “All Tasks” > “Export”.
- The first screen explains the certificate export process.
- Select all of the default values on the next two screens.
- Browse to where you want to save the .CER file and type in the name where asked.
- Verify the options selected and click “Finish” to create your certificate.
- To import the certificate, right-click on the folder and choose “All Tasks” > “Import”. Follow the prompts.
Certificate with password (using PowerShell 5+) 3
Here are the commands to create a password-secured certificate (.PFX)
$cert = New-SelfSignedCertificate -Subject "mydomain.local" -DnsName mydomain.local, *.mydomain.local -CertStoreLocation Cert:\LocalMachine\My -NotAfter (Get-Date).AddYears(10)
$pwd = ConvertTo-SecureString -String "passw0rd!" -Force -AsPlainText
$path = "Cert:\LocalMachine\My" + $cert.thumbprint
Export-PfxCertificate -cert $path -FilePath c:\temp\cert.pfx -Password $pwd
- Open a Powershell window with Admin rights.
- Paste and update the following line with the name of your domain (we’re using “mydomain.local” as an example)
$cert = New-SelfSignedCertificate -Subject "mydomain.local" -DnsName mydomain.local, *.mydomain.local -CertStoreLocation Cert:\LocalMachine\My -NotAfter (Get-Date).AddYears(10)
- Store the encrypted password in memory:
$pwd = ConvertTo-SecureString -String "passw0rd!" -Force -AsPlainText
- Determine the location for the newly created certificate:
$path = "Cert:\LocalMachine\My" + $cert.thumbprint
- Finally, update the -FilePath in the command below and export your new password-protected certificate so you can import it later.
Export-PfxCertificate -cert $path -FilePath c:\temp\cert.pfx -Password $pwd
Test your new certificate
- At a Windows Run screen (Win + R), type “certlm.msc”. This will open the Local Machine’s Certificate Store.
- Open “Personal” > “Certificates”
- Find the certificate you just created and open it.
- Double-check that the “Subject Alternative Name” (DNS Names) has your main site plus wildcard entries for sub-domains.
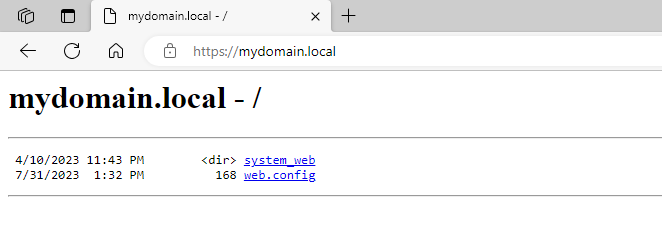
- Open a browser and go to your site using HTTPS (mine is https://mydomain.local) and verify that you can access it. If you need help binding the certificate to your IIS site, I will have instructions in part two of this blog.
- If you are still seeing validation issues, I have found that copying or importing the certificate into the “Trusted Root Certification Authorities” > “Certificates” folder works. Other times, waiting for my machine to register the new certificate has given good results in getting it to work.
Important Note!!
DO NOT use a Self-Signed Certificate for a public app or website. They can be easily compromised and are not intended to be used for public-facing sites. 4
How to set up local HTTPS for Optimizely, IIS, and Kestrel now available in part 2!
References
1 Sslshopper.com. “Stop the ‘Page Contains Secure and Nonsecure Items’ Warning,” 2014. https://www.sslshopper.com/article-stop-the-page-contains-secure-and-nonsecure-items-warning.html.
2 yesman. “Using New-SelfSignedCertificate for Wildcard Certificates.” Stack Overflow, June 9, 2016.https://stackoverflow.com/questions/37728828/using-new-selfsignedcertificate-for-wildcard-certificates/44935574#44935574.
3 Petri IT Knowledgebase. “Create a self-signed certificate using PowerShell,” August 10, 2016. https://petri.com/create-self-signed-certificate-using-powershell/.
4 Keyfactor. “What Is a Self-Signed Certificate? Advantages, Risks & Alternatives,” October 14, 2021. https://www.keyfactor.com/blog/self-signed-certificate-risks/#:~:text=Compromised%20self%2Dsigned%20certificates%20can,signed%20certificate%20creates%20serious%20risk..